


The art of furniture upcycling has emerged as one of the most rewarding and environmentally conscious approaches to home decorating, offering creative individuals the opportunity to transform tired, outdated, or damaged furniture pieces into stunning, personalized treasures that reflect their unique style while contributing to sustainable living practices. This growing movement represents far more than simple cost-saving measures, embodying a philosophy that values creativity, craftsmanship, and environmental responsibility while providing the deep satisfaction that comes from creating something beautiful and functional with your own hands.
Upcycling differs fundamentally from recycling in that it adds value and functionality to existing items rather than breaking them down into raw materials, allowing furniture pieces to maintain their essential character while gaining new life through creative transformation. This process not only diverts furniture from landfills but also reduces the demand for new furniture production, which often involves resource-intensive manufacturing processes and long-distance transportation that contribute to environmental degradation.
The economic benefits of furniture upcycling extend beyond the obvious cost savings of avoiding new furniture purchases to include the potential for developing valuable skills, creating unique pieces that would be expensive to purchase from artisan furniture makers, and even generating income through the sale of transformed pieces. Many successful furniture flippers and upcycling enthusiasts have discovered that their hobby can evolve into profitable side businesses or even full-time careers.
The creative satisfaction derived from furniture upcycling provides psychological benefits that go far beyond the practical outcomes, offering opportunities for self-expression, skill development, and the deep fulfillment that comes from transforming something discarded or unwanted into a beautiful, functional piece that brings joy to daily life. This hands-on creative process can serve as a form of meditation and stress relief while building confidence and problem-solving skills that extend to other areas of life.
Understanding the principles of successful furniture upcycling requires developing an eye for potential in pieces that others might overlook, learning to assess structural integrity and transformation possibilities, and building a toolkit of techniques and skills that can be applied to various types of furniture and design challenges. The most successful upcycling projects begin with careful planning that considers the piece’s existing condition, the desired outcome, available skills and tools, and realistic timelines for completion.
Essential Tools and Materials for Furniture Upcycling
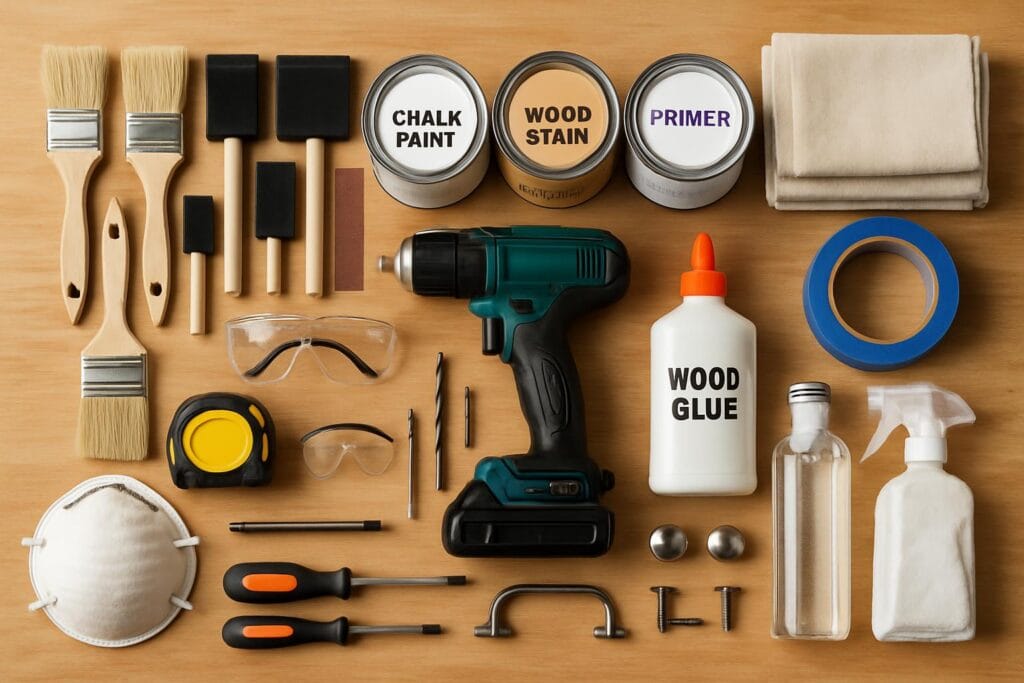
Success in furniture upcycling depends heavily on having access to the right tools and materials, though the specific requirements vary significantly depending on the types of projects you plan to undertake and the level of transformation you want to achieve. Building a comprehensive toolkit gradually allows you to take on increasingly complex projects while ensuring that you have the equipment needed to achieve professional-quality results that will stand the test of time.
Basic hand tools form the foundation of any furniture upcycling toolkit, with essential items including a variety of screwdrivers for removing and installing hardware, pliers for gripping and manipulating small parts, a hammer for general assembly and disassembly tasks, and measuring tools including rulers, measuring tapes, and squares for ensuring accurate cuts and alignments. Quality hand tools represent worthwhile investments that will serve you well across numerous projects, making it wise to choose well-made options that will maintain their functionality and accuracy over time.
Power tools significantly expand your capabilities and efficiency in furniture upcycling projects, with a cordless drill being perhaps the most versatile and frequently used power tool for tasks ranging from removing old hardware to installing new components and creating pilot holes for screws. An orbital sander saves enormous amounts of time and effort in surface preparation while providing more consistent results than hand sanding, particularly on large surfaces or pieces with multiple coats of old paint or finish.
Cutting tools enable you to modify furniture dimensions, create new components, or repair damaged sections, with a circular saw or miter saw being valuable for making straight cuts in lumber, while a jigsaw provides the ability to make curved cuts and navigate around obstacles. For smaller projects and detail work, a good set of hand saws and a sharp utility knife handle many cutting tasks without requiring power tools.
Painting supplies represent a significant category of materials for most upcycling projects, with the specific requirements depending on the type of paint and finish you plan to use. High-quality brushes in various sizes ensure smooth, professional-looking paint application, while foam rollers and small paint rollers provide efficient coverage for larger surfaces. Drop cloths protect your work area from paint spills and overspray, while painter’s tape enables clean, sharp lines when creating multi-color designs or protecting areas that shouldn’t be painted.
Sandpaper and abrasives are essential for surface preparation, which often determines the success or failure of paint and finish applications. Having a variety of grits available, from coarse papers for initial paint removal to fine grits for final smoothing, ensures that you can properly prepare any surface for its new finish. Sanding blocks and electric sanders make the sanding process more efficient and help achieve consistent results across large surfaces.
Adhesives and fasteners enable repairs and modifications that extend beyond simple cosmetic changes, with wood glue being essential for repairing loose joints and attaching new components, while various screws, nails, and specialized fasteners allow for secure assembly of modified or repaired pieces. Understanding which adhesives and fasteners work best for different materials and applications helps ensure that your modifications will be durable and long-lasting.
Safety equipment protects you during the upcycling process, with safety glasses being essential when using power tools or working with chemicals, dust masks protecting your lungs during sanding and painting operations, and work gloves providing protection when handling rough materials or sharp edges. Investing in proper safety equipment and developing safe working habits prevents injuries that could derail your projects and ensures that furniture upcycling remains an enjoyable hobby.
Finishing materials including stains, sealers, and protective topcoats determine the final appearance and durability of your upcycled pieces, with the specific products depending on the look you want to achieve and the intended use of the furniture. Understanding the properties and applications of different finishing materials helps you choose products that will provide the appearance and protection your projects require.
Storage and organization solutions for your tools and materials make the upcycling process more efficient and enjoyable while protecting your investments in equipment and supplies. A dedicated workspace with proper storage keeps tools organized and easily accessible while providing a clean, safe environment for working on projects.
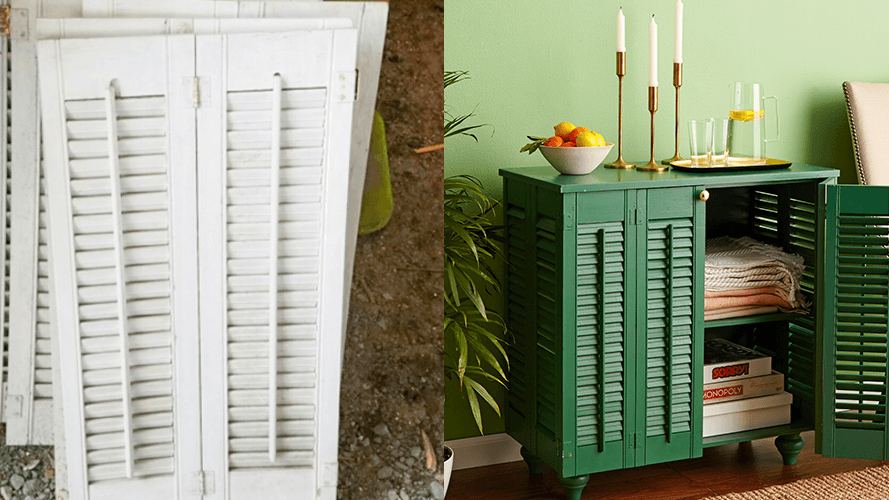
Project 1: Painting and Distressing a Dresser
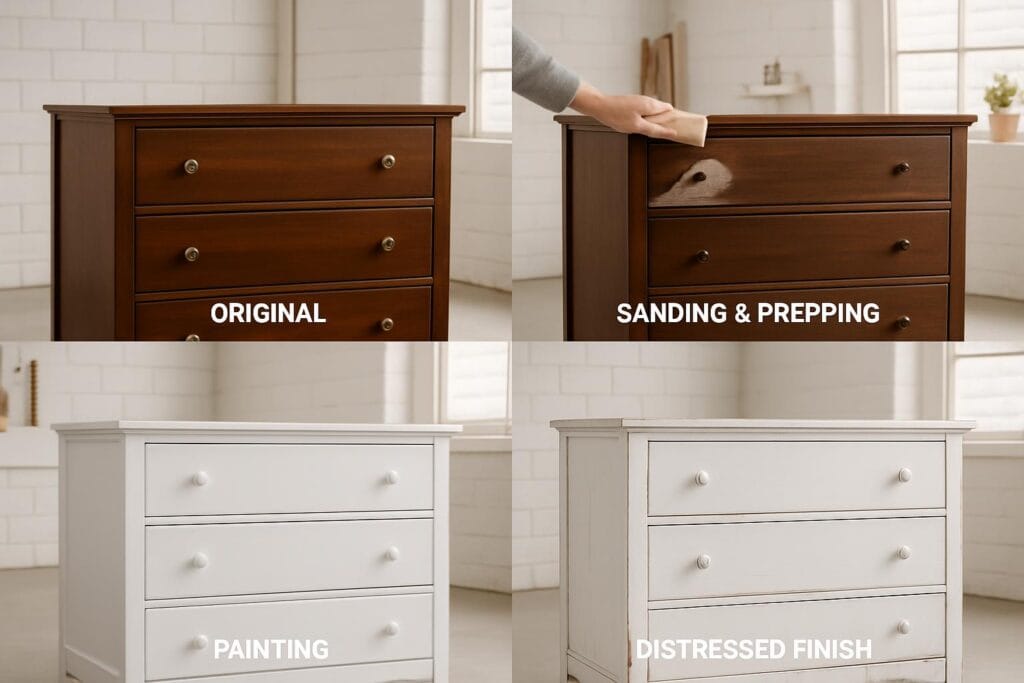
Transforming a dresser through painting and distressing represents one of the most popular and accessible furniture upcycling projects, offering dramatic visual impact while requiring relatively basic skills and tools. This project demonstrates fundamental techniques that can be applied to many other furniture pieces while providing an excellent introduction to the satisfying process of furniture transformation.
Selecting the right dresser for this project requires evaluating both the piece’s structural condition and its potential for transformation, with solid wood construction generally providing the best results due to its durability and ability to accept paint and distressing techniques effectively. Dressers with interesting details like raised panels, decorative molding, or unique hardware often produce more visually striking results than completely plain pieces, as these details become highlighted through the distressing process.
Surface preparation represents the most critical phase of any painting project, determining both the adhesion of the new finish and the overall quality of the final result. Begin by removing all hardware including drawer pulls, knobs, and hinges, keeping track of which pieces came from which locations to ensure proper reassembly. Clean all surfaces thoroughly with a degreasing cleaner to remove dirt, wax, and oils that could interfere with paint adhesion.
Sanding requirements depend on the existing finish and the type of paint you plan to use, with chalk paint often requiring minimal sanding while traditional latex or oil-based paints may require more thorough surface preparation. Focus on creating a slightly rough surface that will accept the new paint rather than trying to remove every trace of the old finish, unless the existing finish is severely damaged or incompatible with your chosen paint system.
Primer application may be necessary depending on the existing finish and your chosen paint, with high-quality primers helping to ensure proper adhesion while preventing bleed-through of stains or previous colors. Tinted primers can reduce the number of paint coats required while providing better coverage, particularly when making dramatic color changes from dark to light finishes.
Paint selection significantly affects both the application process and the final appearance of your project, with chalk paint offering easy application and excellent distressing characteristics, while latex paint provides durability and a wide range of color options. Consider the intended use of the dresser when selecting paint, with high-traffic pieces benefiting from more durable paint formulations that can withstand regular handling and cleaning.
Application techniques affect the final texture and appearance of your painted finish, with brush application creating subtle texture that enhances the hand-painted look, while roller application provides smoother, more uniform coverage. Multiple thin coats generally produce better results than fewer thick coats, allowing each layer to dry completely before applying the next.
Distressing techniques create the aged, vintage appearance that makes painted furniture look authentically old rather than simply painted, with the key being to distress areas where natural wear would occur over time. Focus on edges, corners, and high-touch areas like around drawer pulls and the top surface, using sandpaper to gently remove paint and reveal the wood or previous finish underneath.
Color selection for distressing can dramatically affect the final appearance, with natural wood showing through creating a warm, traditional look, while allowing darker paint colors to show through can create more dramatic contrast. Consider the overall color scheme of the room where the dresser will be used when planning your distressing approach.
Protective finishing ensures that your painted and distressed dresser will maintain its appearance through regular use, with options ranging from paste wax for a traditional look to polyurethane for maximum durability. The choice of protective finish affects both the appearance and maintenance requirements of your piece, with some finishes requiring periodic renewal while others provide long-lasting protection.
Hardware considerations can significantly enhance the transformation, with new knobs and pulls providing opportunities to update the style and improve functionality while complementing the new paint finish. Consider the scale, style, and finish of new hardware in relation to the overall design aesthetic you want to achieve.
Project 2: Reupholstering a Dining Chair
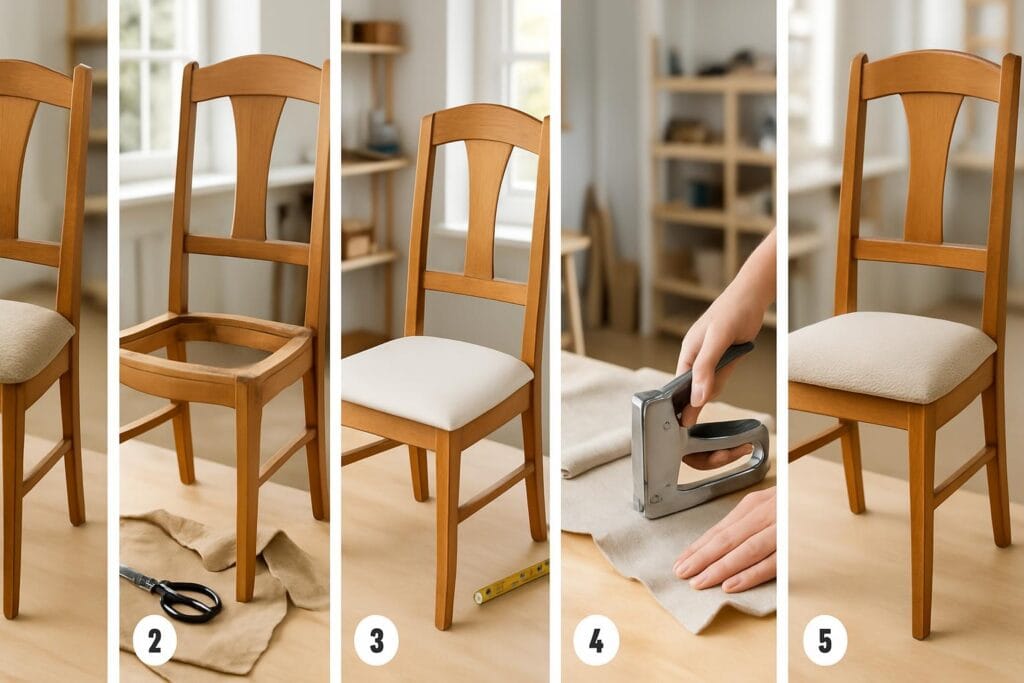
Reupholstering dining chairs offers an excellent introduction to fabric work while providing dramatic transformation potential for pieces that may be structurally sound but visually tired due to worn, stained, or outdated upholstery. This project teaches valuable skills in fabric selection, pattern matching, and upholstery techniques while demonstrating how new fabric can completely change the character and style of furniture pieces.
Chair assessment begins with evaluating the structural integrity of the frame, checking for loose joints, broken components, or other issues that should be addressed before beginning the upholstery work. Chairs with solid wood frames generally provide the best foundation for reupholstery, while pieces with damaged frames may require repair work that could complicate the project significantly.
Fabric selection represents one of the most important decisions in any reupholstery project, affecting both the appearance and durability of the finished piece. Consider the intended use of the chairs when selecting fabric, with dining chairs requiring durable, stain-resistant materials that can withstand regular use and occasional spills. Fabric weight and weave structure affect both durability and ease of installation, with medium-weight fabrics generally providing the best balance of workability and performance.
Pattern and color considerations should take into account both the existing decor and the scale of the furniture piece, with larger patterns working well on substantial chairs while smaller patterns or solid colors may be more appropriate for delicate or smaller pieces. Consider how the fabric pattern will align across multiple chairs if you’re reupholstering a set, as consistent pattern placement creates a more professional and cohesive appearance.
Removal of old upholstery provides valuable information about the original construction methods while revealing the condition of the padding and support systems underneath. Take photographs during the removal process to document the original construction, as this information will guide the reassembly process and help ensure that the new upholstery is installed correctly.
Padding assessment and replacement may be necessary if the original foam or batting has deteriorated, compressed, or become contaminated with odors or stains. High-density foam provides excellent support and longevity for seat cushions, while batting or fiberfill can be used to soften edges and create smooth transitions between different materials.
Template creation using the old fabric pieces ensures accurate cutting of the new fabric while minimizing waste and ensuring proper fit. Label each template piece clearly and note any special considerations like pattern direction or matching requirements that will affect the cutting and installation process.
Cutting techniques for upholstery fabric require attention to grain direction, pattern placement, and seam allowances to ensure professional results. Sharp fabric scissors or a rotary cutter provide clean cuts that won’t fray, while proper measuring and marking techniques help ensure accuracy and consistency across multiple pieces.
Installation methods vary depending on the chair construction and the type of fabric being used, with staple guns providing the most common attachment method for most upholstery projects. Proper staple placement and tension control ensure secure attachment without creating puckers or distortions in the fabric surface.
Finishing details including welting, trim, or decorative elements can significantly enhance the professional appearance of reupholstered chairs while providing opportunities to add personal style touches. These details require additional planning and skill but can transform a basic reupholstery project into a truly custom piece.
Quality control throughout the installation process helps ensure professional results, with regular checking for proper tension, smooth surfaces, and consistent appearance across all pieces. Taking time to make adjustments during the installation process prevents problems that would be difficult to correct after completion.
Project 3: Adding New Hardware to Transform Cabinets

Updating cabinet hardware represents one of the most cost-effective and impactful furniture transformations possible, often providing dramatic style updates for a fraction of the cost of cabinet replacement while requiring minimal tools and skills. This project demonstrates how small details can have enormous impact on the overall appearance and functionality of furniture pieces.
Hardware assessment begins with evaluating the existing hardware to determine what can be reused, what needs replacement, and what opportunities exist for upgrades or style changes. Consider both the functional performance and aesthetic appeal of existing hardware, as worn or damaged pieces may affect both the appearance and usability of the cabinets.
Style selection for new hardware should complement both the cabinet style and the overall design aesthetic of the room, with traditional cabinets often benefiting from classic hardware styles while contemporary cabinets may work better with sleek, modern hardware designs. Consider the scale of the hardware in relation to the cabinet doors and drawers, as oversized hardware can overwhelm small doors while undersized hardware may look lost on large surfaces.
Finish coordination between hardware and other elements in the room creates cohesive design schemes that feel intentional and well-planned. Consider existing finishes on lighting fixtures, plumbing fixtures, and other metal elements when selecting hardware finishes, as coordinating these elements creates visual harmony throughout the space.
Measurement and layout planning ensures that new hardware will be positioned correctly and consistently across all cabinet doors and drawers. Create templates or use hardware jigs to ensure consistent placement, as even small variations in positioning can be visually distracting and affect the professional appearance of the installation.
Hole modification may be necessary when changing hardware styles or sizes, with some new hardware able to use existing holes while others require new holes to be drilled. When existing holes don’t align with new hardware, they can often be filled and refinished to hide evidence of the previous installation.
Installation techniques vary depending on the type of hardware and cabinet construction, with most installations requiring only basic tools like screwdrivers and drill bits. Proper pilot hole drilling prevents splitting of cabinet doors while ensuring secure attachment of the new hardware.
Functional improvements can be achieved through hardware upgrades, with soft-close hinges reducing noise and wear while full-extension drawer slides improve access to cabinet contents. These functional upgrades may require more extensive modification but can significantly improve the usability and longevity of cabinet systems.
Quality considerations in hardware selection affect both the immediate appearance and long-term performance of the installation, with higher-quality hardware typically providing better finishes, smoother operation, and longer service life. Consider the frequency of use and the importance of durability when making quality decisions.
Maintenance requirements vary significantly between different hardware finishes and materials, with some requiring regular cleaning and polishing while others maintain their appearance with minimal care. Understanding maintenance requirements helps ensure that your hardware investment will continue to look good over time.
Cost management strategies can help maximize the impact of hardware upgrades while staying within budget constraints, with options including mixing high-end pieces in prominent locations with more budget-friendly options in less visible areas, or focusing upgrades on the most frequently used or visible cabinets first.
Project 4: Repurposing an Old Cabinet into a Kitchen Island
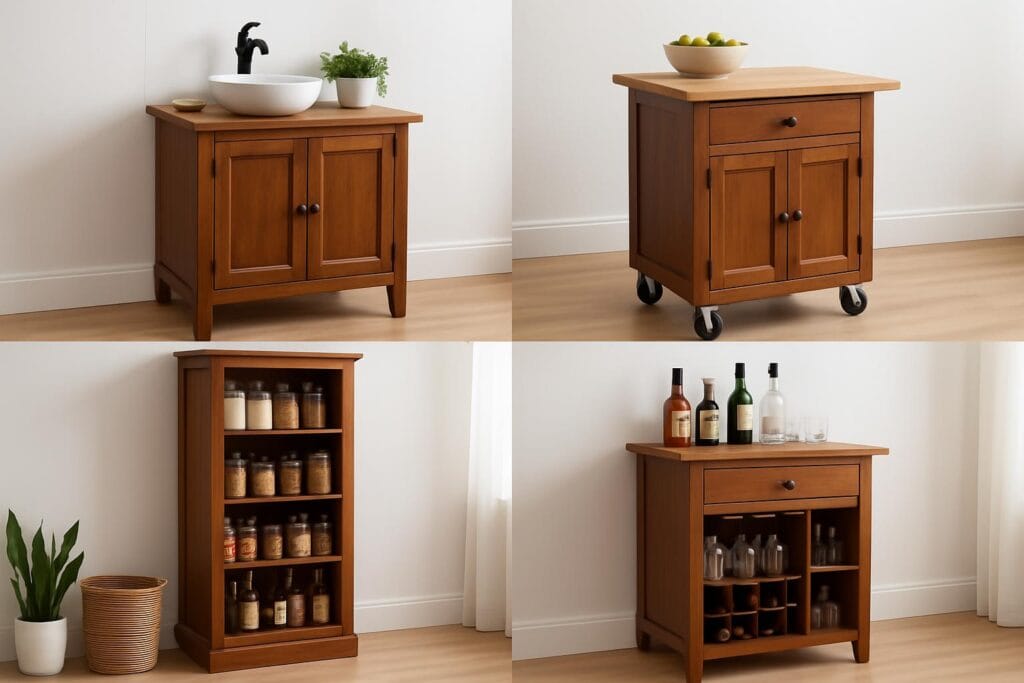
Transforming an old cabinet into a functional kitchen island demonstrates the creative potential of furniture repurposing while addressing practical storage and workspace needs in modern kitchens. This project requires more advanced planning and modification skills than simple cosmetic updates but provides substantial functional benefits along with the satisfaction of creating a truly custom piece.
Cabinet selection for island conversion requires evaluating both the size and construction of potential pieces, with larger cabinets generally providing more useful storage and workspace while requiring adequate kitchen space to accommodate the finished island. Consider the cabinet’s height in relation to standard counter heights, as modifications may be necessary to achieve proper working height.
Design planning should consider both the functional requirements and aesthetic goals for the finished island, including storage needs, workspace requirements, electrical considerations for lighting or appliances, and traffic flow patterns in the kitchen. Sketch out the planned modifications and create a materials list before beginning work to ensure that you have everything needed to complete the project.
Structural modifications may include adding or removing shelves, installing drawers, creating openings for appliances or storage baskets, or reinforcing the cabinet to handle the additional weight and stress of island use. These modifications require careful planning to maintain the structural integrity of the cabinet while achieving the desired functionality.
Mobility considerations determine whether the island will be permanently positioned or designed to be moved as needed, with casters providing mobility while potentially affecting the overall height and stability of the piece. Locking casters allow for both mobility and stability when the island is in use.
Countertop selection significantly affects both the functionality and appearance of the finished island, with options ranging from butcher block for a warm, traditional look to granite or quartz for durability and easy maintenance. Consider the intended use of the workspace when selecting countertop materials, as food preparation areas may benefit from different materials than serving or display areas.
Electrical integration may be desired for task lighting, small appliances, or device charging, requiring careful planning for wire routing and outlet placement. Electrical work should be performed by qualified professionals to ensure safety and code compliance.
Storage optimization takes advantage of the cabinet’s existing structure while adding features that enhance functionality for kitchen use, such as pull-out shelves, spice racks, or specialized storage for kitchen tools and appliances. Consider the items you plan to store when designing storage solutions.
Finishing considerations should coordinate with existing kitchen elements while reflecting the island’s new function, with durable finishes that can withstand kitchen use and cleaning requirements. The finish should complement existing cabinetry while potentially serving as an accent piece that adds visual interest to the kitchen.
Safety considerations include ensuring adequate clearance around the island for safe movement, securing the island to prevent tipping if it will be used for food preparation, and ensuring that any electrical work meets safety codes and requirements.
Budget management for this project should account for both materials and potential professional services like electrical work or countertop installation, with the total cost often being significantly less than purchasing a comparable new kitchen island while providing the satisfaction of creating a custom piece.
Project 5: Creating a Vintage Look with Chalk Paint Techniques
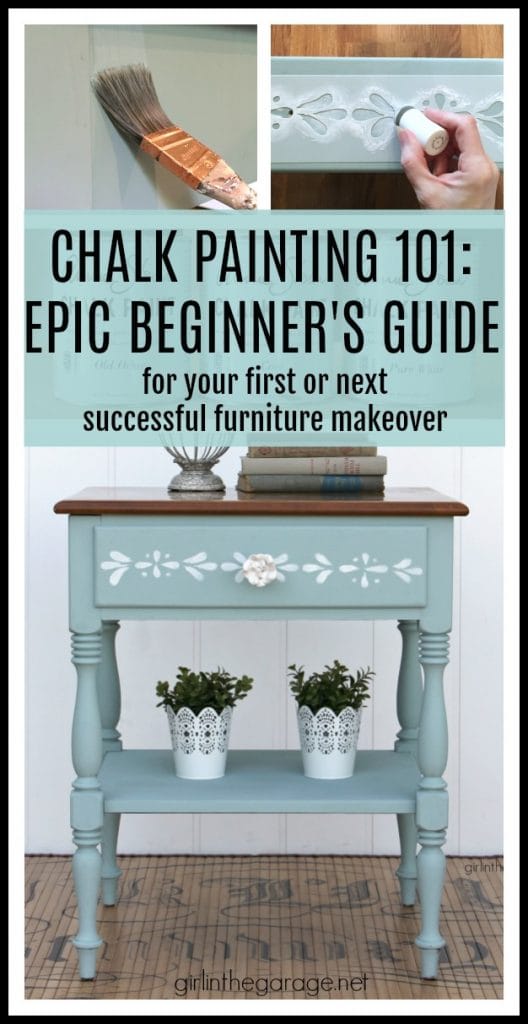
Chalk paint has revolutionized furniture upcycling by providing an easy-to-use medium that creates authentic vintage appearances while requiring minimal surface preparation and offering excellent adhesion to most surfaces. Understanding chalk paint techniques opens up numerous possibilities for creating aged, distressed, and layered finishes that would be difficult to achieve with traditional paint systems.
Chalk paint characteristics include excellent coverage, minimal odor, quick drying times, and the ability to adhere to most surfaces without extensive preparation, making it ideal for furniture upcycling projects. The matte finish and unique texture of chalk paint provide an authentic aged appearance that serves as an excellent foundation for distressing and aging techniques.
Surface preparation for chalk paint is minimal compared to traditional paints, typically requiring only cleaning to remove dirt and grease, though some situations may benefit from light sanding to improve adhesion. The forgiving nature of chalk paint makes it an excellent choice for beginners or for projects where extensive preparation time is not available.
Color selection and layering techniques can create complex, authentic-looking finishes that simulate years of natural aging and wear. Consider using multiple colors in layers, with darker base colors showing through lighter top coats to create depth and visual interest that mimics natural aging patterns.
Application methods for chalk paint include brush application for texture and character, or roller application for smoother finishes, with the choice depending on the desired final appearance. Brush marks and texture are often desirable in chalk paint finishes, as they contribute to the hand-painted, vintage character.
Distressing techniques with chalk paint can be performed while the paint is still slightly damp for subtle effects, or after complete drying for more controlled distressing. Sandpaper, steel wool, or even damp cloths can be used to create different distressing effects that simulate natural wear patterns.
Layering and color washing techniques create complex finishes that appear to have developed over time through multiple paint applications and natural aging. These techniques require practice to master but can produce stunning results that would be impossible to achieve with single-color applications.
Wax finishing is the traditional protective coating for chalk paint, providing a soft, natural sheen while enhancing the paint’s color and protecting the surface from wear and moisture. Different wax colors can be used to create additional aging effects, with dark wax settling into crevices and details to enhance the vintage appearance.
Alternative protective finishes including polyurethane or polycrylic can be used when greater durability is required, though these may alter the characteristic matte appearance of chalk paint. Consider the intended use of the piece when selecting protective finishes.
Troubleshooting common chalk paint issues helps ensure successful projects, with solutions for problems like poor adhesion, brush marks, or uneven coverage. Understanding these potential issues and their solutions helps prevent problems and ensures professional-looking results.
Maintenance of chalk paint finishes varies depending on the protective coating used, with waxed finishes requiring periodic renewal while sealed finishes providing longer-lasting protection. Understanding maintenance requirements helps ensure that your chalk paint projects will continue to look good over time.
Project 6: Transforming a Bookshelf with Fabric Backing
Adding fabric backing to a bookshelf represents a simple yet effective way to introduce color, pattern, and visual interest while creating a more finished, custom appearance that transforms an ordinary piece into a designer-quality focal point. This project demonstrates how small additions can have significant impact while requiring minimal investment in materials and tools.
Bookshelf assessment begins with evaluating the construction and condition of the piece, ensuring that it’s structurally sound and suitable for the intended transformation. Consider the depth of the shelves and the visibility of the back panel, as these factors affect both the visual impact and the practical considerations of adding fabric backing.
Fabric selection should consider both aesthetic and practical factors, including the scale of any patterns in relation to the shelf openings, the durability of the fabric for long-term display, and the color coordination with existing decor and the items that will be displayed on the shelves. Consider how the fabric will look both with and without items on the shelves.
Measurement and cutting require careful attention to ensure proper fit and professional appearance, with allowances for wrapping around edges or fitting into grooves depending on the installation method chosen. Accurate measurements prevent waste and ensure that the fabric will fit properly without gaps or excessive overlap.
Installation methods vary depending on the bookshelf construction and personal preferences, with options including adhesive application for permanent installation, stapling for semi-permanent attachment, or removable methods like tension rods or magnetic strips that allow for easy changes in the future.
Pattern matching becomes important when using patterned fabrics across multiple shelf openings, requiring careful planning to ensure that patterns align properly and create a cohesive appearance across the entire piece. This may require purchasing additional fabric to allow for pattern matching.
Edge finishing techniques ensure a professional appearance while preventing fraying or other deterioration over time. Options include hemming, binding with coordinating trim, or using fabric that doesn’t require edge finishing like felt or other non-fraying materials.
Lighting considerations can enhance the visual impact of fabric backing, with internal shelf lighting creating dramatic effects while highlighting both the fabric and the displayed items. Consider the heat generation of any lighting when selecting fabrics and installation methods.
Maintenance requirements vary depending on the fabric chosen and the installation method, with some fabrics requiring periodic cleaning or replacement while others maintain their appearance with minimal care. Consider the long-term maintenance implications when making fabric and installation choices.
Styling opportunities are enhanced by fabric backing, which can serve as a coordinating element that ties together displayed items while providing a backdrop that makes collections more visually cohesive. Consider how the fabric choice will work with your existing collections and display items.
Seasonal variations can be achieved through removable fabric backing systems that allow for easy changes to reflect different seasons, holidays, or decorating themes. This flexibility makes the bookshelf a dynamic element in room design rather than a static piece.
Project 7: Converting a Dresser into a Bathroom Vanity
Converting a dresser into a bathroom vanity combines the charm of vintage furniture with modern functionality while often providing better storage and character than standard bathroom vanities. This advanced project requires plumbing modifications and careful planning but can create a truly unique focal point that adds personality and style to bathroom spaces.
Dresser selection for vanity conversion requires careful consideration of size, height, construction, and style to ensure that the finished piece will function well in the bathroom environment while providing adequate storage and workspace. Solid wood construction is generally preferred for bathroom applications due to its durability and ability to withstand moisture when properly sealed.
Plumbing planning represents the most complex aspect of this project, requiring coordination with existing plumbing locations or planning for plumbing modifications to accommodate the new vanity location and configuration. Professional plumbing consultation may be necessary to ensure proper installation and code compliance.
Moisture protection is critical for furniture used in bathroom environments, requiring proper sealing of all wood surfaces and careful attention to areas where water exposure is likely. Multiple coats of high-quality polyurethane or marine-grade finishes provide the protection necessary for long-term durability in humid conditions.
Sink selection affects both the functionality and appearance of the finished vanity, with options including vessel sinks that sit on top of the dresser surface, undermount sinks that require cutting the top, or drop-in sinks that require precise measurement and cutting. Consider the style and scale of the sink in relation to the dresser proportions.
Countertop modifications may be necessary to accommodate plumbing and sink installation, with options including cutting the existing top, replacing it entirely, or adding a new surface over the existing top. The choice depends on the dresser construction, desired appearance, and budget considerations.
Storage modifications can optimize the dresser’s storage capacity for bathroom use, with considerations for plumbing clearance, ventilation, and the specific items that will be stored. Drawer modifications may be necessary to accommodate plumbing while maintaining maximum storage functionality.
Ventilation considerations help prevent moisture damage and ensure long-term durability, with options including ventilation holes, gaps for air circulation, or mechanical ventilation systems. Proper ventilation is particularly important in enclosed storage areas where moisture could accumulate.
Electrical integration may be desired for lighting, outlets, or other electrical features, requiring careful planning for wire routing and proper electrical installation. All electrical work in bathroom environments must meet specific safety codes and should be performed by qualified professionals.
Finishing techniques for bathroom vanities must provide both aesthetic appeal and moisture protection, with multiple coats of high-quality finishes being essential for long-term durability. Consider both the appearance and maintenance requirements when selecting finishing products.
Installation considerations include securing the vanity to wall studs for stability, ensuring proper clearances for doors and drawers, and coordinating with existing bathroom fixtures and finishes. Professional installation may be advisable for complex plumbing and electrical connections.
Safety Considerations and Best Practices
Safety should always be the primary consideration in any furniture upcycling project, as the tools, materials, and techniques involved can present various hazards that require proper precautions and safety equipment to prevent injury and ensure successful project completion. Understanding and implementing proper safety practices protects both your health and your investment in tools and materials while ensuring that furniture upcycling remains an enjoyable and rewarding hobby.
Personal protective equipment represents the first line of defense against injury during furniture upcycling projects, with safety glasses being essential whenever using power tools, sanding, or working with chemicals that could splash or create airborne particles. Quality safety glasses should fit properly and provide adequate coverage while allowing clear vision for detailed work.
Respiratory protection becomes critical when sanding, painting, or working with chemicals that produce fumes or airborne particles, with dust masks providing basic protection for light sanding while respirators offer more comprehensive protection for extensive sanding or chemical work. Understanding when different levels of respiratory protection are needed helps prevent both acute and long-term health problems.
Hearing protection should be used whenever operating loud power tools, as prolonged exposure to high noise levels can cause permanent hearing damage. Foam earplugs or noise-canceling headphones provide effective protection while allowing you to hear important sounds like changes in tool operation that might indicate problems.
Hand and skin protection through appropriate gloves prevents cuts, splinters, chemical burns, and contact with harmful substances while providing better grip and control when handling materials and tools. Different types of gloves are appropriate for different tasks, with work gloves for general handling, chemical-resistant gloves for painting and finishing, and cut-resistant gloves for sharp tool work.
Ventilation requirements vary depending on the materials and processes being used, with adequate air circulation being essential when using paints, stains, adhesives, or other products that produce fumes. Work outdoors when possible, or ensure adequate ventilation in indoor workspaces through fans, open windows, or mechanical ventilation systems.
Tool safety practices include proper maintenance, correct usage, and appropriate storage of all tools to prevent accidents and ensure reliable operation. Regular inspection and maintenance of power tools prevents malfunctions that could cause injury, while proper storage protects both tools and people from damage and accidents.
Chemical safety involves understanding the properties and hazards of all materials used in furniture upcycling, including paints, solvents, adhesives, and cleaning products. Read and follow all manufacturer safety instructions, store chemicals properly, and dispose of waste materials according to local regulations to protect both health and environment.
Fire safety considerations include proper storage of flammable materials, adequate fire extinguisher access, and understanding of fire hazards associated with different materials and processes. Oil-soaked rags can spontaneously combust and should be disposed of properly, while proper storage of flammable liquids prevents fire hazards.
Electrical safety becomes important when using power tools or adding electrical features to furniture projects, with proper grounding, circuit protection, and professional installation being essential for safety. Never use damaged electrical tools or work in wet conditions with electrical equipment.
Workspace safety involves maintaining clean, organized work areas that minimize trip hazards and provide adequate space for safe tool operation. Proper lighting prevents accidents while enabling quality work, and adequate storage keeps tools and materials organized and accessible.
Emergency preparedness includes having first aid supplies readily available, knowing how to respond to common workshop injuries, and having emergency contact information easily accessible. Understanding basic first aid for cuts, burns, and other common workshop injuries can prevent minor accidents from becoming serious problems.
Lead paint considerations are particularly important when working with older furniture, as lead-based paints were commonly used before 1978 and require special handling and disposal procedures. Test for lead paint before beginning any project involving paint removal, and follow EPA guidelines for safe handling if lead is present.
Frequently Asked Questions
What’s the best type of furniture to start with for a beginner upcycling project?
Start with solid wood pieces in good structural condition, such as dressers, side tables, or chairs. Avoid pieces with extensive damage, veneer that’s peeling badly, or particle board construction. Look for pieces with simple lines and minimal intricate details for your first projects. Thrift stores, estate sales, and online marketplaces are great sources for affordable practice pieces.
Do I need to strip old paint completely before applying new paint?
Not always. Chalk paint and some specialty furniture paints can adhere well to existing finishes with minimal preparation. However, if the old paint is chipping, peeling, or incompatible with your new paint, stripping may be necessary. Light sanding to create a rough surface for adhesion is often sufficient. Always test your new paint on a small, hidden area first.
How much should I expect to spend on tools and supplies for furniture upcycling?
Basic starter costs range from 100−300foressentialtools(drill, sander, brushes, safety equipment)andsupplies.Youcanstartwithbasictoolsandupgradegradually.Manytoolscanbeborrowedorrentedforoccasionaluse.Thecostperprojectvarieswidelybuttypicallyrangesfrom100-300 for essential tools (drill, sander, brushes, safety equipment) and supplies. You can start with basic tools and upgrade gradually. Many tools can be borrowed or rented for occasional use. The cost per project varies widely but typically ranges from100−300foressentialtools(drill, sander, brushes, safety equipment)andsupplies.Youcanstartwithbasictoolsandupgradegradually.Manytoolscanbeborrowedorrentedforoccasionaluse.Thecostperprojectvarieswidelybuttypicallyrangesfrom20-100 depending on the size of the piece and materials chosen.
What’s the difference between chalk paint and regular paint for furniture?
Chalk paint requires minimal surface preparation, dries quickly, and creates a matte finish that’s ideal for distressing. It’s more expensive but easier for beginners. Regular latex or acrylic paint is more durable and less expensive but typically requires more surface preparation and priming. Chalk paint is better for decorative pieces, while regular paint works well for high-use items.
How do I know if a piece of furniture is worth upcycling?
Check the structural integrity first – joints should be tight, and there shouldn’t be major damage. Solid wood pieces are generally worth more effort than particle board or laminate. Consider the cost of materials versus buying new, and whether you have the skills needed for required repairs. If you love the piece’s bones and it’s structurally sound, it’s probably worth upcycling.
What safety precautions should I take when upcycling furniture?
Always wear safety glasses, dust masks when sanding, and gloves when handling chemicals. Work in well-ventilated areas, especially when painting or using solvents. Test older furniture for lead paint before sanding. Keep a first aid kit nearby, and never rush through safety steps. Proper ventilation and respiratory protection are especially important for indoor projects.
How do I choose the right fabric for reupholstering furniture?
Consider the furniture’s use – dining chairs need durable, stain-resistant fabrics while decorative pieces can use more delicate materials. Look for upholstery-weight fabrics (typically 12+ ounces per yard). Consider pattern scale relative to the furniture size, and ensure you have enough fabric plus 10-15% extra for mistakes. Pre-treat fabrics for stain resistance if needed.
Can I upcycle furniture if I live in an apartment with limited space?
Yes, but choose smaller projects and plan carefully. Use drop cloths to protect floors, ensure adequate ventilation, and consider noise levels for neighbors. Focus on projects requiring minimal sanding or use low-odor paints. Some steps like major sanding might need to be done elsewhere. Balconies or garages can provide additional workspace if available.
How long do upcycling projects typically take?
Simple painting projects can take a weekend, while complex reupholstering or major modifications might take several weeks. Factor in drying time between coats, which can extend project timelines significantly. Plan for 2-3 times longer than you initially estimate, especially for your first few projects. Weather can affect drying times and outdoor work schedules.
What should I do if I make a mistake during my project?
Most mistakes can be fixed with patience and the right approach. Paint mistakes can often be sanded and repainted. Fabric can usually be removed and replaced. Document your process with photos so you can backtrack if needed. Don’t panic – many “mistakes” can become design features with creative thinking. Join online communities for advice and support.
How do I price upcycled furniture if I want to sell it?
Research similar pieces in your area and online marketplaces. Factor in your material costs, time invested, and skill level. Unique, high-quality pieces command higher prices. Document your process with before/after photos to show the transformation value. Start with lower prices to build a reputation, then increase as you gain experience and recognition.
What’s the best way to dispose of old paint and chemicals from upcycling projects?
Never pour paint or chemicals down drains or throw them in regular trash. Most communities have hazardous waste collection days or permanent drop-off locations. Paint stores often accept old paint for recycling. Oil-soaked rags should be spread out to dry completely before disposal or stored in water-filled metal containers to prevent spontaneous combustion.

