


Gallery walls have become one of the most popular and impactful ways to transform any space in your home. These carefully curated collections of artwork, photographs, and decorative objects can turn a blank wall into a stunning focal point that reflects your personality, tells your story, and elevates the entire aesthetic of your room. Whether you’re working with a small hallway, a grand living room, or any space in between, mastering the art of gallery walls can help you create a sophisticated, personalized environment that feels both intentional and effortlessly stylish.
The beauty of a gallery wall lies in its versatility and accessibility. Unlike single large pieces of artwork that can be expensive and limiting, gallery walls allow you to mix and match different types of art, photographs, and objects at various price points. This approach not only makes art collecting more affordable but also creates opportunities for creativity and personal expression that simply aren’t possible with traditional single-piece displays.
However, creating a successful gallery wall is more complex than simply hanging a few frames on a wall. It requires careful planning, thoughtful curation, and strategic execution to achieve a look that appears effortless while actually being quite intentional. The difference between a gallery wall that looks professionally designed and one that appears haphazard often comes down to understanding and applying fundamental principles of design, proportion, and visual balance.
In this comprehensive guide, we’ll walk you through every aspect of creating a stunning gallery wall, from the initial planning stages through the final hanging process. You’ll learn how to select artwork that works well together, how to plan layouts that are both visually appealing and proportionally correct, and how to execute the hanging process with confidence and precision.
Understanding the Foundation: What Makes a Great Gallery Wall
Before diving into the practical steps of creating your gallery wall, it’s essential to understand what separates an exceptional gallery wall from a mediocre one. Great gallery walls share several key characteristics that work together to create visual harmony and impact.
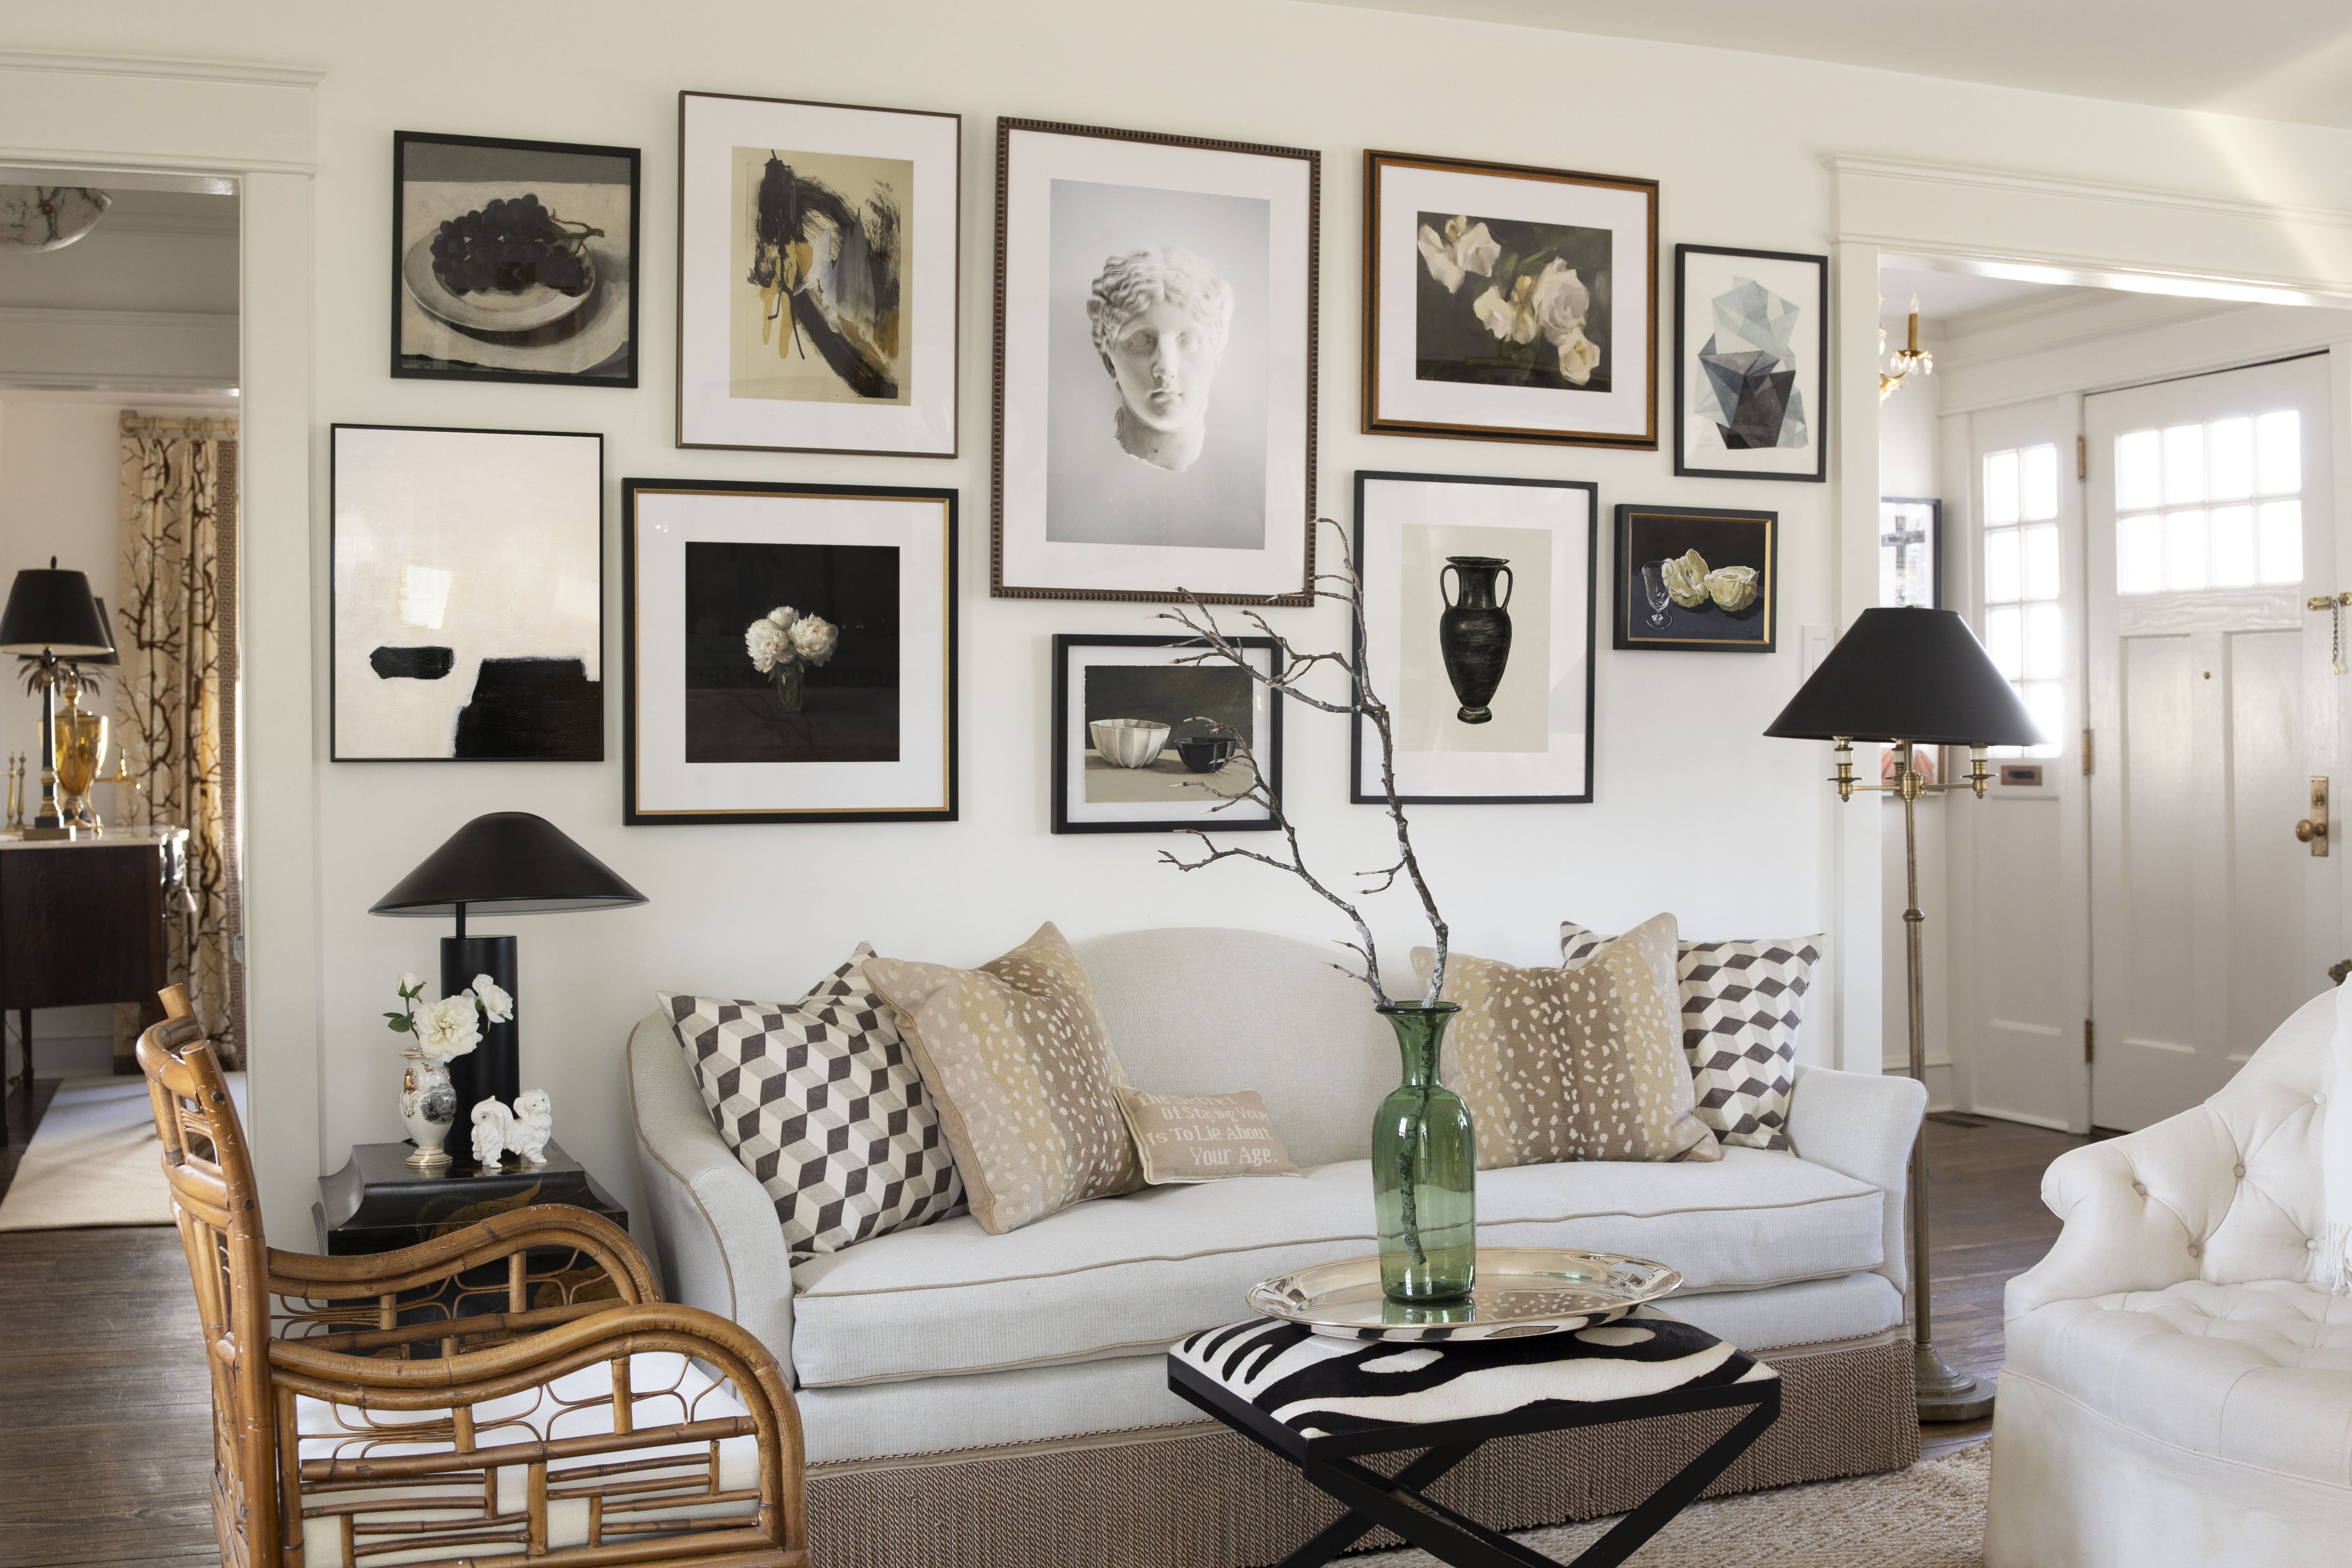
First and foremost, successful gallery walls have a unifying element that ties all the pieces together. This doesn’t mean everything needs to match perfectly, but there should be some common thread that creates cohesion. This unifying element might be a consistent color palette, similar frame styles, a common theme or subject matter, or even a shared artistic medium. The key is that when someone looks at your gallery wall, they should feel that the pieces belong together, even if they’re quite different individually.
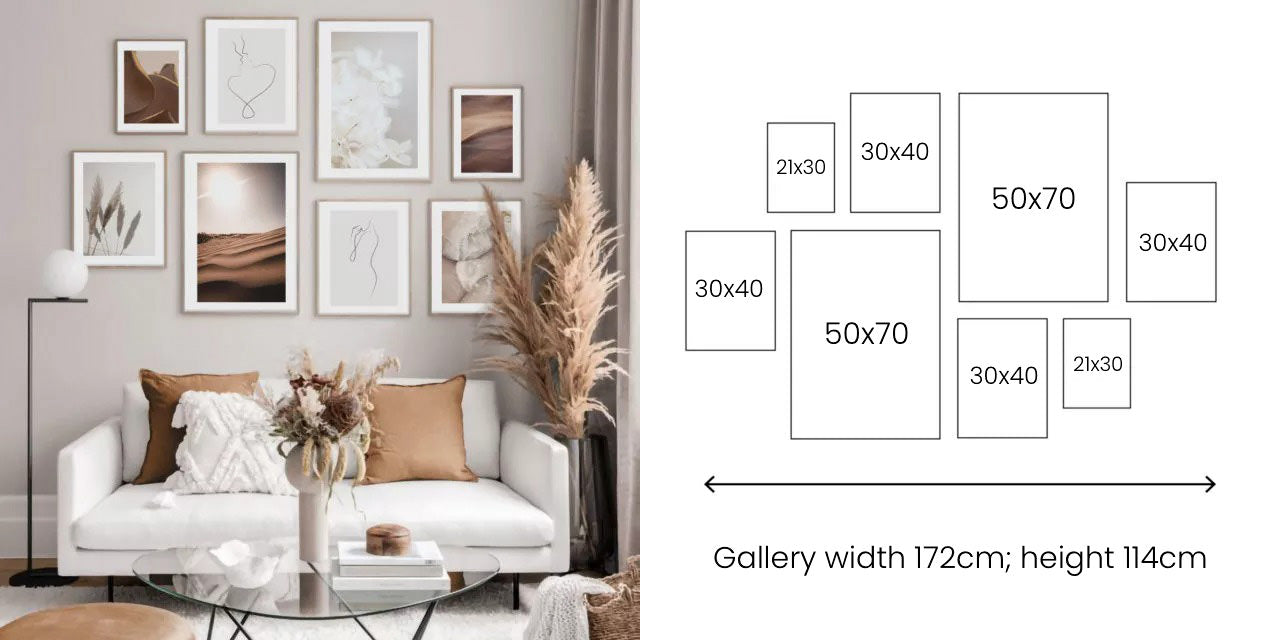
Proportion and scale play crucial roles in gallery wall success. The overall size of your gallery wall should be appropriate for the wall space and the room itself. A tiny collection of small prints will get lost on a large wall, while an oversized gallery wall can overwhelm a small space. Within the gallery wall itself, you need to balance different sizes of artwork to create visual interest without chaos. This typically means including a mix of larger anchor pieces and smaller supporting pieces, arranged in a way that feels balanced and intentional.
Visual weight distribution is another critical factor that many people overlook. Visual weight refers to how much attention different elements draw to themselves based on factors like size, color intensity, contrast, and subject matter. A successful gallery wall distributes visual weight evenly across the composition, so no single area feels too heavy or too light compared to the rest. This might mean balancing a large, bold piece on one side with several smaller pieces on the other, or distributing colorful pieces throughout the arrangement rather than clustering them in one area.
The spacing between pieces is equally important as the pieces themselves. Consistent spacing creates a sense of order and intentionality, while inconsistent spacing can make even beautiful artwork look haphazard. Most successful gallery walls use spacing of 2-3 inches between frames, though this can vary slightly based on the size of the pieces and the overall scale of the wall.
Finally, great gallery walls tell a story or convey a mood. Whether it’s a collection of family photographs that chronicles your life’s journey, a mix of botanical prints that reflects your love of nature, or an eclectic combination of pieces that showcases your diverse interests, the best gallery walls feel personal and meaningful to their creators.
Step 1: Selecting Your Artwork and Pieces
The foundation of any great gallery wall is the artwork and objects you choose to include. This selection process is both the most creative and most challenging aspect of gallery wall creation, as it requires balancing aesthetic considerations with personal meaning, budget constraints, and practical factors like size and availability.
When beginning your selection process, start by gathering pieces you already own and love. These might include family photographs, artwork you’ve collected over the years, prints you’ve been meaning to frame, or even three-dimensional objects like small sculptures or decorative plates. Having a core collection of meaningful pieces will help guide your additional selections and ensure your gallery wall feels personal rather than generic.
As you expand your collection, consider the overall mood and style you want to achieve. Are you drawn to a clean, minimalist aesthetic with simple black and white photography? Do you prefer a more eclectic, bohemian feel with mixed media and varied colors? Or perhaps you’re aiming for something more traditional with classic paintings and formal portraits? Having a clear vision of your desired aesthetic will help guide your selection process and prevent you from acquiring pieces that don’t work well together.
Color is one of the most important unifying elements in gallery wall design. You don’t need to stick to a monochromatic palette, but having some color consistency will help create cohesion. This might mean choosing pieces that all contain similar accent colors, sticking to a specific color temperature (warm or cool), or selecting pieces within a limited color range. If you prefer a more neutral approach, black and white photography or artwork with muted tones can create a sophisticated, timeless look.
Subject matter and theme provide another opportunity for creating unity within diversity. You might choose to focus on a specific theme like nature, travel, or portraiture, or you might prefer a more eclectic mix that reflects your varied interests. The key is to ensure that even diverse pieces feel like they belong together through some common element, whether that’s style, color, or simply your personal connection to each piece.
Don’t overlook the importance of varying sizes and orientations within your collection. A mix of large and small pieces, horizontal and vertical orientations, and even some square pieces will create more visual interest than a collection of similarly sized pieces. However, be mindful of proportion – if you’re working with a smaller wall space, a collection of very large pieces might overwhelm the area.
Consider including some three-dimensional elements to add depth and texture to your gallery wall. Small shelves with decorative objects, floating frames, or even small mirrors can break up the flat plane of traditional framed artwork and create more visual interest. Just be sure these elements complement rather than compete with your artwork.
Budget considerations are practical but important. Gallery walls are wonderful because they allow you to build a collection gradually over time. Start with pieces you already own, then add new pieces as you find them and as your budget allows. Look for affordable options like prints from online retailers, pieces from local art fairs, or even your own photography printed and framed. Remember that the frame and matting can significantly impact the perceived value of a piece, so investing in quality framing for even inexpensive prints can elevate the entire collection.
Step 2: Planning Your Layout
Once you’ve selected your artwork, the next crucial step is planning your layout. This planning phase is where many people rush ahead and end up with disappointing results, but taking time to carefully plan your arrangement will save you time, frustration, and wall damage later.
Begin by measuring your wall space and determining the overall dimensions for your gallery wall. A good rule of thumb is to leave at least 6-8 inches of wall space around the perimeter of your gallery wall, though this can vary based on the size of your room and the scale of your furniture. If you’re hanging your gallery wall above a piece of furniture like a sofa or console table, the gallery wall should typically be about two-thirds the width of the furniture piece below it.
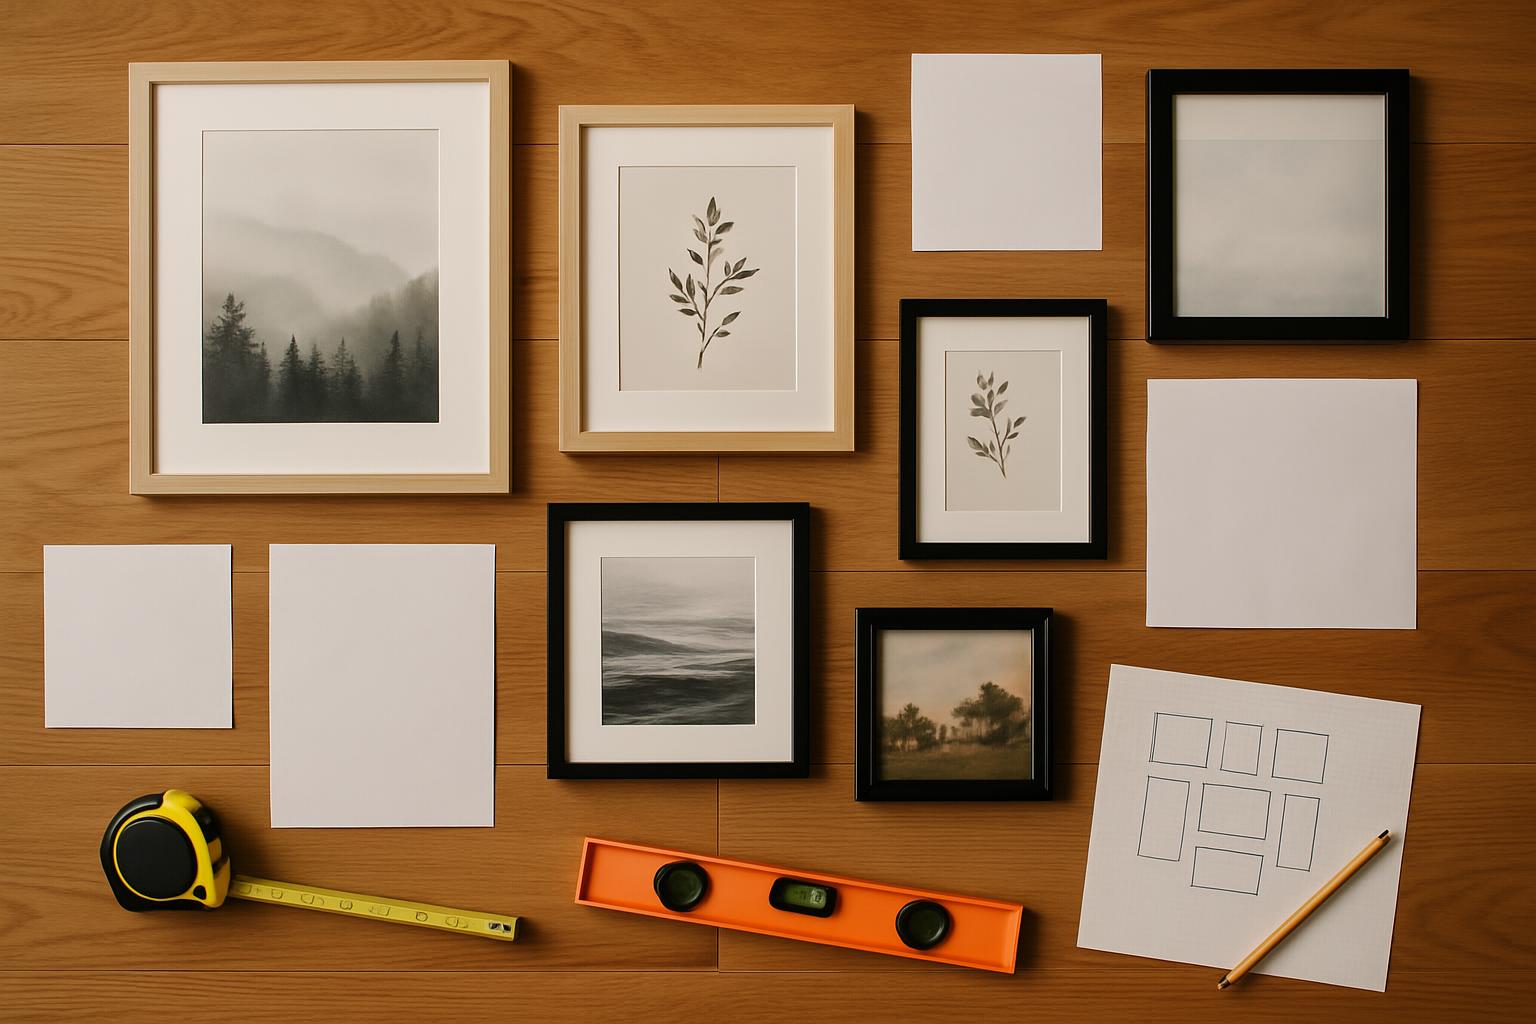
Create paper templates of each piece you plan to include in your gallery wall. Measure each frame (including the frame itself, not just the artwork) and cut corresponding pieces of paper or newspaper to the same size. This step might seem tedious, but it’s absolutely essential for successful layout planning. These templates will allow you to experiment with different arrangements without putting any holes in your wall.
Start your layout planning on the floor in a space large enough to accommodate your entire gallery wall. Lay out your paper templates and begin experimenting with different arrangements. This is where the creative process really begins, and you should expect to try multiple configurations before finding one that feels right.
When arranging your templates, start with your largest or most important piece and use it as an anchor. This anchor piece will help determine the placement of everything else. From there, work outward, balancing visual weight and creating pleasing relationships between adjacent pieces. Step back frequently to assess the overall composition from a distance, as this will give you a better sense of how the arrangement will look when hung on the wall.
Pay attention to the negative space between pieces as well as the pieces themselves. The spaces between artwork are just as important as the artwork itself in creating a successful composition. Aim for consistent spacing of 2-3 inches between frames, though you can vary this slightly for visual interest or to accommodate different sized pieces.
Consider the sight lines and viewing angles in your room when planning your layout. The center of your gallery wall should typically be at eye level, which is generally around 57-60 inches from the floor. However, this can vary based on the height of your ceilings and the scale of your furniture. If you’re hanging your gallery wall above a sofa, the bottom edge should typically be 6-8 inches above the back of the sofa.
Think about how people will move through and use the space when viewing your gallery wall. Will they primarily see it from straight on, or will they approach it from an angle? Will they be sitting or standing when viewing it most often? These considerations can influence both the height and the internal arrangement of your gallery wall.
Don’t be afraid to create an asymmetrical arrangement. While symmetrical layouts can be beautiful and calming, asymmetrical arrangements often feel more dynamic and interesting. The key to successful asymmetry is achieving visual balance even when the arrangement isn’t perfectly symmetrical. This might mean balancing a large piece on one side with several smaller pieces on the other, or using color and visual weight to create equilibrium.
Consider creating multiple smaller groupings within your larger gallery wall, especially if you’re working with a very large wall space. These sub-groupings can help break up the wall and make the overall arrangement feel more manageable and intentional. Each grouping should work well on its own while also contributing to the overall composition.
Once you’ve settled on a layout you love, take a photograph of your floor arrangement before moving the templates to the wall. This will serve as your reference when you begin the hanging process and ensure you don’t lose track of your carefully planned arrangement.
Step 3: Choosing and Coordinating Frames
The frames you choose for your gallery wall can make or break the entire composition. Frames serve not only to protect and present your artwork but also to unify disparate pieces and contribute to the overall aesthetic of your gallery wall. Understanding how to select and coordinate frames is essential for creating a professional-looking result.
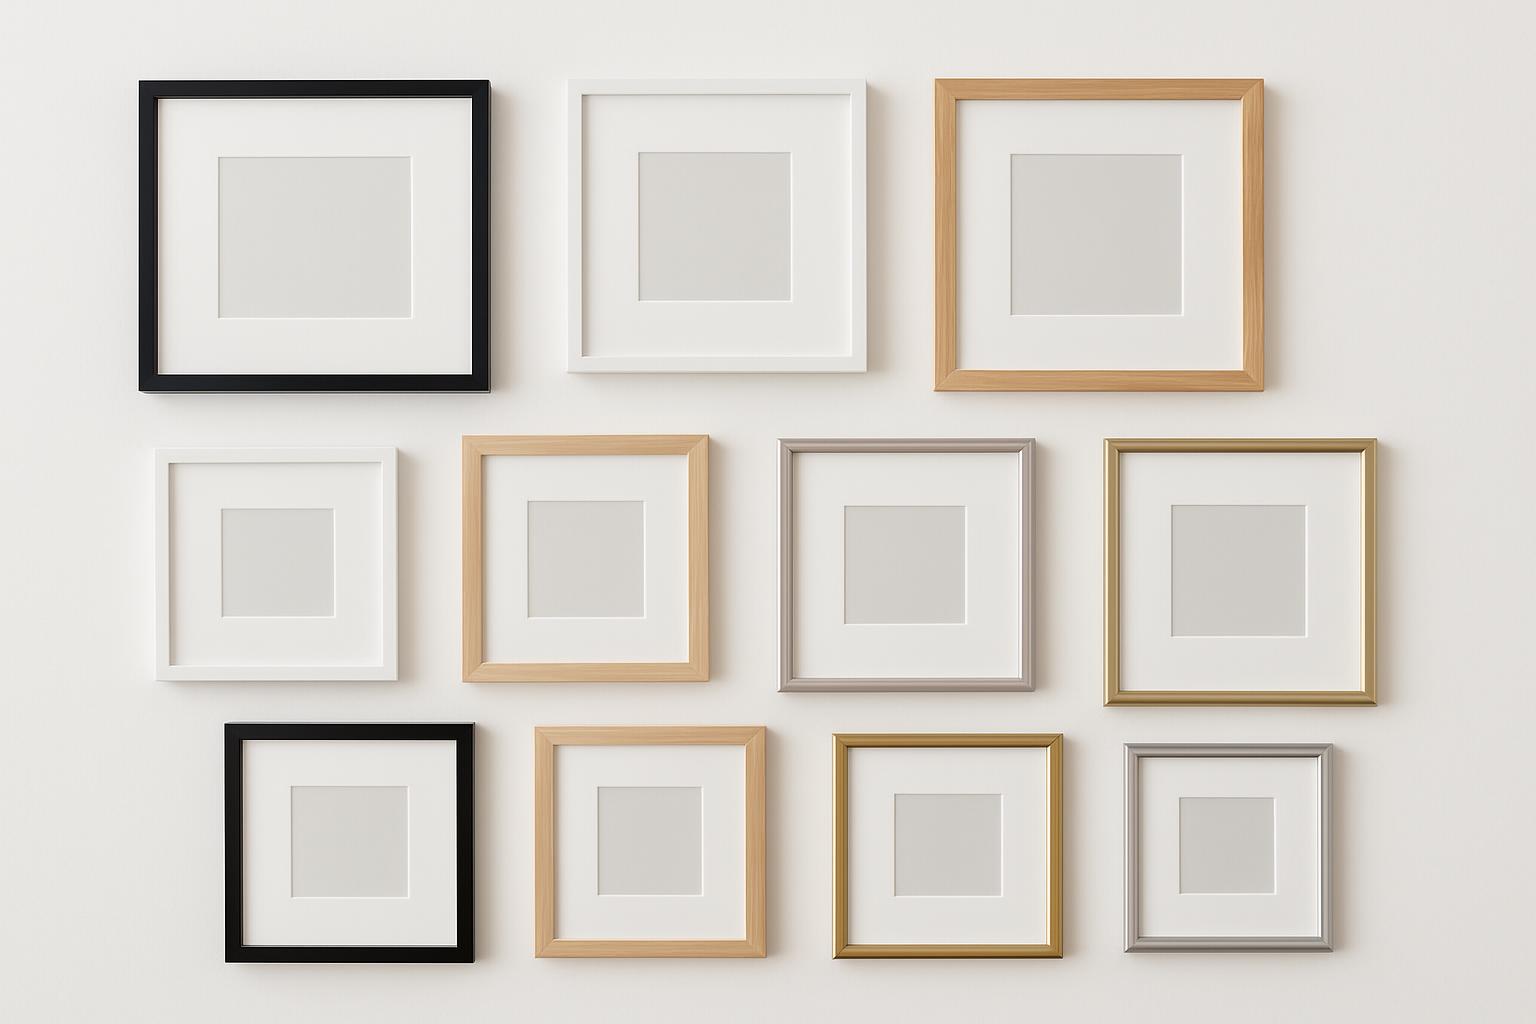
The most straightforward approach to frame coordination is to use identical frames throughout your gallery wall. This creates instant cohesion and allows the artwork itself to be the star of the show. Black frames are a popular choice for this approach because they’re versatile, timeless, and work well with almost any type of artwork. White or natural wood frames can also work beautifully, depending on your overall aesthetic and the colors in your room.
However, using identical frames isn’t your only option, and mixing frame styles can create more visual interest and personality. If you choose to mix frames, the key is to maintain some unifying element. This might mean using frames in the same color family but different styles, or frames in different colors but similar proportions and materials. For example, you might mix black and white frames for a classic look, or combine different wood tones for a more organic, collected-over-time feel.
When mixing frame styles, limit yourself to no more than three different types to avoid visual chaos. You might choose one primary frame style that makes up about 60-70% of your collection, with one or two accent frame styles used sparingly for variety. This approach maintains cohesion while adding visual interest.
Consider the style and period of your artwork when selecting frames. Contemporary photography might look best in sleek, minimal frames, while vintage botanical prints might be enhanced by more ornate, traditional frames. However, don’t feel bound by these conventions – sometimes unexpected frame choices can create interesting and successful contrasts.
The width and proportion of your frames matter more than you might think. Thin frames tend to feel more modern and minimal, while thicker frames can feel more substantial and traditional. Very thin frames can sometimes get lost, especially from a distance, while very thick frames can overwhelm delicate artwork. Most successful gallery walls use frames with similar proportions, even if the styles vary.
Matting is another important consideration that can significantly impact the look of your gallery wall. Mats create breathing room around artwork and can help standardize different sized pieces. White or cream mats are classic choices that work with almost anything, but colored mats can add interest and help tie pieces together. If you’re mixing matted and unmatted pieces, be intentional about the distribution to maintain visual balance.
The finish and material of your frames contribute to the overall mood of your gallery wall. Glossy finishes tend to feel more formal and contemporary, while matte finishes feel more casual and organic. Metal frames can add a modern, industrial touch, while wood frames feel warmer and more traditional. Consider how these choices align with your overall design aesthetic and the mood you want to create.
Budget-conscious frame selection doesn’t mean compromising on quality or appearance. Many affordable frame options are available from retailers like IKEA, Target, and online sources. You can also update existing frames with spray paint to create a cohesive look, or look for frames at thrift stores and garage sales that you can refinish. The key is to ensure that whatever frames you choose are well-made enough to properly protect and display your artwork.
Don’t forget about the hardware and hanging systems for your frames. Consistent hanging hardware not only makes the installation process easier but also ensures that all your frames hang at the same angle and distance from the wall. Picture wire and D-rings are popular choices that work well for most frame weights and sizes.
Step 4: The Planning Process
The planning process is where your gallery wall vision begins to take concrete shape. This phase requires patience and attention to detail, but the time invested here will pay dividends in the final result. Proper planning prevents the frustration of multiple nail holes, crooked arrangements, and the need to start over.
Begin by transferring your floor layout to the wall using your paper templates. Start by finding and marking the center point of your planned gallery wall area. This will serve as your reference point for the entire arrangement. Use a level and measuring tape to ensure your center point is accurate, as any errors here will compound throughout the rest of the installation.
Tape your paper templates to the wall in the exact arrangement you planned on the floor. Use removable painter’s tape that won’t damage your wall surface. This step allows you to see how your arrangement will actually look in the space and make any necessary adjustments before committing to nail holes. Step back and view the arrangement from different angles and distances to ensure it looks balanced and proportional in the actual space.
Pay special attention to the relationship between your gallery wall and the furniture below it. The arrangement should feel connected to and proportional with the furniture, not floating independently above it. If something feels off at this stage, now is the time to make adjustments by moving your templates around.
Once you’re satisfied with the template arrangement, mark the hanging points for each piece. For each template, measure and mark where the nail or hanging hardware will need to be placed. This typically involves measuring from the top of the frame to the hanging point on the back of the frame, then transferring that measurement to your template. Be precise with these measurements, as small errors can result in crooked or misaligned pieces.
Consider the weight of each piece when planning your hanging hardware. Lightweight pieces can typically be hung with simple picture hanging nails, while heavier pieces may require wall anchors or screws into wall studs. If you’re unsure about the weight capacity of your wall or hanging hardware, err on the side of caution and use more robust hanging solutions.
Create a installation sequence that makes logical sense and minimizes the risk of bumping into already-hung pieces. Generally, it’s best to start with pieces in the center or top of the arrangement and work outward and downward. This approach helps ensure proper alignment and reduces the chance of accidentally knocking into pieces you’ve already hung.
Double-check all your measurements before making any holes in the wall. Use a level to ensure your marks are straight and properly aligned with each other. It’s worth taking extra time at this stage to verify everything is correct, as fixing mistakes after you’ve started hanging pieces is much more difficult and time-consuming.
Consider enlisting a helper for the hanging process, especially if you’re working with a large gallery wall or heavy pieces. Having someone to hold pieces while you check alignment, or to step back and assess the arrangement from a distance, can be invaluable in achieving professional-looking results.
Document your planning process with photographs. Take pictures of your template arrangement on the wall, your marked hanging points, and any other reference information that might be helpful during the hanging process. This documentation can be especially valuable if you need to take a break during the installation or if you want to recreate a similar arrangement in the future.
Step 5: Essential Tools and Materials
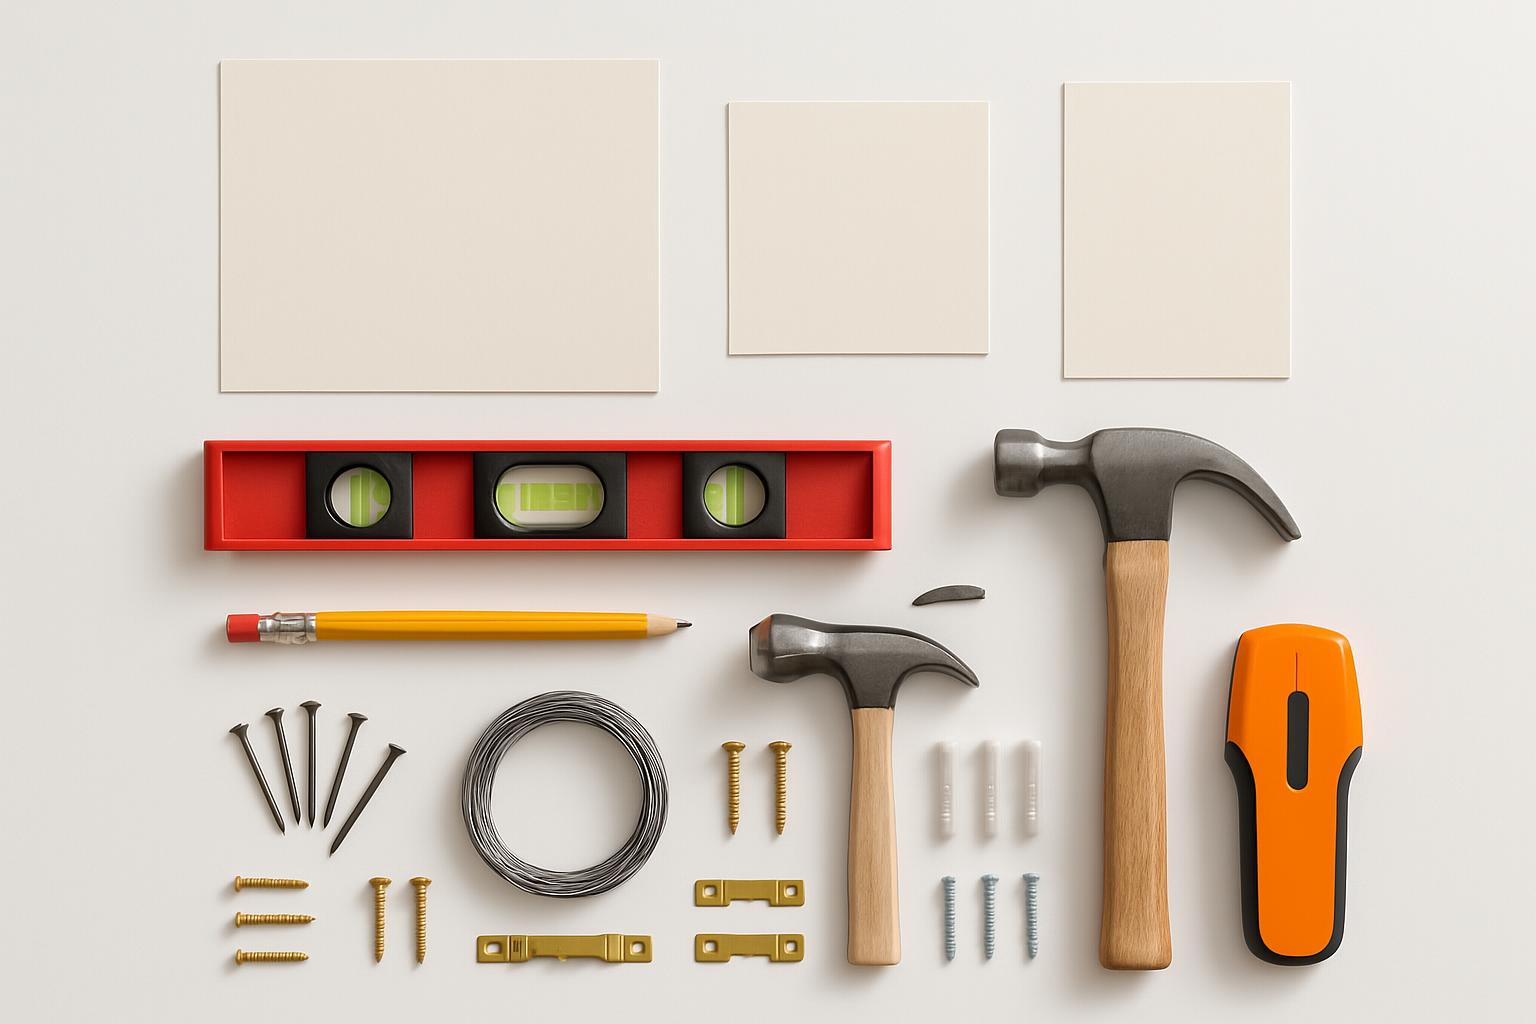
Having the right tools and materials is crucial for successfully executing your gallery wall installation. While you don’t need professional-grade equipment, having quality basic tools will make the process much easier and help ensure professional-looking results.
A high-quality level is perhaps the most important tool for gallery wall installation. A 24-inch level is ideal for most gallery wall projects, as it’s long enough to ensure accuracy while still being manageable to use. Digital levels can be helpful for their precision, but a traditional bubble level works perfectly well for most applications. Some people prefer smaller levels for individual pieces, but having a longer level helps ensure overall alignment across the entire gallery wall.
A reliable measuring tape is essential for accurate spacing and alignment. A 25-foot tape measure is usually sufficient for most home projects and provides the flexibility to measure larger spaces when needed. Look for a tape measure with clear, easy-to-read markings and a sturdy case that will hold up to regular use.
A stud finder can be invaluable, especially when hanging heavier pieces that require more substantial wall anchors. Electronic stud finders are generally more reliable than magnetic ones, though they can be finicky on textured walls or walls with multiple layers of paint. If you’re having trouble with a stud finder, you can also locate studs by tapping on the wall and listening for the change in sound, or by using a small finish nail to probe for the solid wood behind the drywall.
Picture hanging hardware comes in many varieties, and choosing the right type for your specific needs is important for both security and ease of installation. Picture hanging nails are suitable for lightweight pieces up to about 20 pounds. For heavier pieces, consider using screws with wall anchors or toggle bolts. Sawtooth hangers are convenient for lighter pieces but can be less secure than wire hanging systems. D-rings and picture wire provide a secure hanging method that works well for most frame weights and allows for easy adjustment.
Wall anchors are necessary when hanging pieces that are too heavy for simple nails or when you can’t hit a wall stud. Plastic expansion anchors work well for medium-weight pieces, while toggle bolts or molly bolts provide more holding power for heavier items. Choose anchors rated for more weight than your pieces actually weigh to provide a safety margin.
A hammer is obviously necessary for driving nails, but consider using a tack hammer for smaller nails and delicate work. The smaller head provides more control and reduces the risk of accidentally hitting the wall or damaging your hanging hardware. For screws, a cordless drill with appropriate bits will make installation much faster and easier than using a manual screwdriver.
Pencils are essential for marking hanging points and making reference marks on the wall. Use a pencil rather than a pen, as pencil marks are easier to erase if you need to make adjustments. A mechanical pencil or a sharp regular pencil will provide the most precise marks.
Painter’s tape or masking tape is useful for temporarily holding templates in place and for protecting wall surfaces during installation. Choose a tape that removes cleanly without damaging paint or leaving residue. Blue painter’s tape is generally a safe choice for most wall surfaces.
A small step ladder or sturdy stool will likely be necessary for reaching higher hanging points safely. Make sure any ladder you use is stable and appropriate for your height and the height of your gallery wall. Never overreach from a ladder, and always have someone spot you if possible.
Consider having some basic wall repair materials on hand in case you need to fill unwanted nail holes or make other minor repairs. Lightweight spackling compound, a small putty knife, and touch-up paint can help you fix any mistakes or changes you need to make during the installation process.
Step 6: The Hanging Process
With your planning complete and your tools assembled, you’re ready to begin the actual hanging process. This is where your careful preparation pays off, but it’s still important to work methodically and double-check your work at each step.
Start by removing your paper templates one at a time, beginning with the piece you’ve designated as your starting point. As you remove each template, immediately mark the hanging point with a pencil, using the measurements you determined during the planning phase. This approach ensures you don’t lose track of your carefully planned arrangement.
Before driving any nails or screws, double-check your measurements and use your level to ensure the hanging point is properly positioned. It’s much easier to correct a mistake before you’ve made a hole in the wall than after. If you’re using wall anchors, drill the appropriate size pilot hole before inserting the anchor.
Hang your first piece and use your level to ensure it’s straight. This first piece will serve as a reference point for all the others, so it’s crucial that it’s positioned correctly. Step back and assess how it looks in relation to the furniture below and the overall space. If something doesn’t look right, now is the time to make adjustments.
Continue hanging pieces one at a time, checking the alignment and spacing of each piece as you go. Use your level frequently to ensure pieces are straight, and step back regularly to assess the overall composition. It’s easy to get focused on individual pieces and lose sight of how they work together as a whole.
Pay special attention to the spacing between pieces as you work. Consistent spacing is one of the hallmarks of a professional-looking gallery wall, and small variations can be quite noticeable once all the pieces are hung. Use a ruler or measuring tape to check spacing between adjacent pieces, and make adjustments as needed.
If you’re working with a helper, have them step back periodically to assess the arrangement from a distance while you focus on the technical aspects of hanging each piece. A fresh perspective can catch alignment issues or spacing problems that you might miss when you’re focused on the details.
Don’t be afraid to make adjustments as you go. Sometimes what looked perfect in the planning phase needs small tweaks when you see it in reality. Minor adjustments to spacing or positioning can make a significant difference in the final result. However, try to minimize the number of holes you put in the wall by being as accurate as possible with your initial placement.
As you near completion, step back frequently to assess the overall balance and composition. Look for any areas that feel too heavy or too light, any spacing inconsistencies, or any pieces that don’t seem to fit well with their neighbors. Small adjustments at this stage can significantly improve the final result.
Once all pieces are hung, do a final check with your level to ensure everything is straight. Even pieces that were level when you hung them can shift slightly, especially if you bumped them while hanging adjacent pieces. A final leveling pass will ensure your gallery wall looks polished and professional.
Take a step back and admire your work, but also look critically at the final result. Are there any adjustments that would improve the overall composition? Is the spacing consistent throughout? Does the arrangement feel balanced and intentional? Don’t hesitate to make final tweaks if they’ll improve the overall result.
Styling and Final Touches
Creating a successful gallery wall extends beyond just hanging frames on a wall. The final styling and integration with your room’s overall design are what transform a collection of artwork into a cohesive, impactful design element that enhances your entire space.
Consider the lighting that illuminates your gallery wall, as proper lighting can dramatically enhance the impact of your artwork. Natural light is ideal when available, but be mindful of direct sunlight that can fade artwork over time. If your gallery wall doesn’t receive adequate natural light, consider adding picture lights, track lighting, or strategically placed lamps to highlight your collection. The goal is even, warm lighting that allows the colors and details in your artwork to be clearly visible without creating glare or harsh shadows.
Think about how your gallery wall relates to the other elements in your room. The colors, styles, and themes in your artwork should complement your furniture, textiles, and overall design aesthetic. This doesn’t mean everything needs to match perfectly, but there should be some visual connections that tie the room together. You might echo colors from your artwork in throw pillows or accessories, or choose furniture that complements the style and period of your art collection.
Consider adding some three-dimensional elements to break up the flat plane of framed artwork and add visual interest. Small floating shelves can display decorative objects, plants, or small sculptures that complement your artwork. Just be careful not to overcrowd the wall or compete with your main art collection. These additional elements should enhance rather than distract from your gallery wall.
The area around your gallery wall deserves attention as well. If your gallery wall is above a console table or sofa, style these surfaces thoughtfully to complement your wall display. A few carefully chosen accessories, a lamp, or some plants can help ground your gallery wall and integrate it with the rest of the room. However, avoid cluttering these surfaces, as too many competing elements can detract from your gallery wall’s impact.
Consider the seasonal flexibility of your gallery wall. While you don’t want to constantly rearrange everything, having a few pieces that you can easily swap out for seasonal variety can keep your display feeling fresh and current. This might mean having a few pieces that you rotate in and out, or adding seasonal elements like small wreaths or garlands during holidays.
Maintenance is an often-overlooked aspect of gallery wall ownership. Dust your frames and artwork regularly to keep them looking their best. Check periodically to ensure all pieces are still level and securely hung, especially after any vibrations from construction, moving furniture, or other household activities. Touch up any nail holes or wall damage that may occur over time to keep your wall looking polished.
Document your finished gallery wall with photographs from multiple angles and distances. These photos will be helpful if you ever need to recreate the arrangement, and they’ll also allow you to share your success with friends and family. Consider taking both wide shots that show the entire arrangement and detail shots that highlight particularly successful groupings or individual pieces.
Think about how your gallery wall might evolve over time. One of the beauties of gallery walls is their flexibility and ability to grow and change with your interests and life circumstances. Leave some space for future additions, and don’t be afraid to swap out pieces as your tastes evolve or as you acquire new artwork. A gallery wall should be a living, evolving display that reflects your current interests and aesthetic preferences.
Troubleshooting Common Issues
Even with careful planning and execution, you may encounter some common issues when creating your gallery wall. Understanding how to address these problems can help you achieve the professional-looking result you’re aiming for.
One of the most common issues is pieces that appear crooked even when they’re level according to your level tool. This can happen when the wall itself isn’t perfectly plumb, when the frame isn’t perfectly square, or when the hanging hardware isn’t centered on the back of the frame. To address this, trust your eye over your level tool. If a piece looks crooked, adjust it until it appears straight, even if your level says otherwise. Sometimes the visual appearance is more important than technical accuracy.
Spacing inconsistencies can make even beautiful artwork look unprofessional. If you notice that spacing between pieces varies throughout your gallery wall, you may need to make some adjustments. Small spacing variations can often be corrected by slightly repositioning pieces, but larger inconsistencies may require rehanging some pieces. Use a ruler or measuring tape to check spacing between all adjacent pieces and make adjustments as needed.
If your gallery wall feels unbalanced, with some areas appearing too heavy or too light, consider the visual weight distribution of your pieces. Visual weight is affected by factors like size, color intensity, contrast, and subject matter. You may be able to improve balance by swapping the positions of some pieces, or you might need to add or remove pieces to achieve better equilibrium.
Pieces that won’t stay level can be frustrating and may indicate issues with your hanging hardware or wall surface. If a piece consistently shifts after being leveled, check that your hanging hardware is properly installed and that the wall anchor is secure. Sometimes adding a second hanging point can help stabilize a piece that tends to shift.
If your gallery wall looks too sparse or too crowded, you may need to adjust the number of pieces or their arrangement. A sparse-looking gallery wall might benefit from additional pieces or closer spacing, while a crowded arrangement might need some pieces removed or repositioned to create more breathing room.
Color balance issues can make a gallery wall feel off even when the layout is perfect. If certain colors seem to dominate or if the color distribution feels uneven, consider rearranging pieces to better distribute colors throughout the composition. Sometimes adding or removing a single colorful piece can significantly improve the overall color balance.
If your gallery wall doesn’t seem to relate well to the rest of your room, consider how you might better integrate it with your existing decor. This might involve adjusting the colors in your room through accessories, changing the lighting, or repositioning furniture to better complement your gallery wall.
Scale issues can make a gallery wall feel inappropriate for its space. If your gallery wall feels too small for the wall, consider expanding it with additional pieces or increasing the spacing between existing pieces. If it feels too large or overwhelming, you might need to remove some pieces or create multiple smaller groupings instead of one large arrangement.
Frequently Asked Questions
How do I determine the right size for my gallery wall?
The size of your gallery wall should be proportional to both the wall space and the furniture below it. A good rule of thumb is to make your gallery wall about two-thirds the width of the furniture piece below it, and leave 6-8 inches of space above the furniture. For walls without furniture below, aim to fill about 60-75% of the available wall space, leaving adequate breathing room around the perimeter.
Should all my frames be the same color and style?
Not necessarily. While using identical frames creates instant cohesion, mixing frame styles can add visual interest and personality. If you choose to mix frames, limit yourself to 2-3 different styles and maintain some unifying element like color family, material, or proportion. The key is intentional coordination rather than random mixing.
How much space should I leave between frames?
Most successful gallery walls use 2-3 inches of space between frames. This spacing creates visual separation while maintaining cohesion. You can vary this slightly based on the size of your pieces and the overall scale of your wall, but consistency is key to a professional appearance.
What’s the best height to hang a gallery wall?
The center of your gallery wall should typically be at eye level, which is generally 57-60 inches from the floor. However, this can vary based on ceiling height and furniture placement. If hanging above a sofa, the bottom of your gallery wall should be 6-8 inches above the back of the sofa.
Can I include three-dimensional objects in my gallery wall?
Absolutely! Small shelves, mirrors, or decorative objects can add depth and interest to your gallery wall. Just ensure these elements complement rather than compete with your artwork, and maintain the same spacing and alignment principles you use for your framed pieces.
How do I hang heavy pieces securely?
For pieces over 20 pounds, use wall anchors or screws into wall studs rather than simple picture hanging nails. Toggle bolts or molly bolts provide excellent holding power for heavy pieces. Always use hanging hardware rated for more weight than your piece actually weighs to provide a safety margin.
What if I can’t find a stud where I need to hang a heavy piece?
Use appropriate wall anchors designed for your wall type and the weight of your piece. Toggle bolts work well in drywall and can support significant weight. For very heavy pieces, consider using a French cleat system that distributes weight across multiple wall studs.
How do I create a cohesive look with different types of artwork?
Look for unifying elements like color palette, theme, style, or frame coordination. Even very different pieces can work together if they share some common element. Consider the overall mood and aesthetic you want to achieve, and select pieces that contribute to that vision.
Should I plan my gallery wall on paper first?
Yes! Creating paper templates and planning your layout on the floor before hanging anything is crucial for success. This allows you to experiment with different arrangements without putting holes in your wall and helps ensure proper spacing and proportion.
How do I know if my gallery wall is balanced?
Step back and look at your arrangement from a distance. A balanced gallery wall will have visual weight distributed evenly across the composition, with no single area feeling too heavy or too light. Consider factors like size, color intensity, and subject matter when assessing balance.
Can I add to my gallery wall over time?
Absolutely! One of the beauties of gallery walls is their flexibility. You can start with a smaller collection and add pieces over time as you find them and as your budget allows. Just be mindful of maintaining the overall balance and cohesion as you expand your collection.
What’s the biggest mistake people make with gallery walls?
The most common mistake is rushing the planning process and hanging pieces without careful consideration of spacing, proportion, and overall composition. Taking time to plan your layout thoroughly before making any holes in the wall is essential for professional-looking results.

