


Ready to give your space a glow-up without breaking the bank or your sanity? Enter removable wallpaper — the ultimate DIY home decor game changer that’s about to transform your walls from drab to fab in a snap! With an endless array of patterns and colors, it’s like having a magic wand for your interior design dreams. Whether you’re channeling boho chic vibes or going for sleek modern minimalism, removable wallpaper is here to make your walls the talk of the town (or at least your living room).
Let’s face it: not all of us are blessed with the ability to envision a complete home makeover from scratch. That’s where DIY projects come in clutch! They not only unleash your inner creative genius but also give you that exhilarating rush of accomplishment when you finally step back and admire your handiwork. Plus, removable wallpaper is as forgiving as it gets — no more panic attacks over permanent decisions! So roll up those sleeves, grab your favorite playlist, and let’s dive into the world of how to install wallpaper like a pro. Your dream space is just a peel-and-stick away!
Choosing the Right Removable Wallpaper
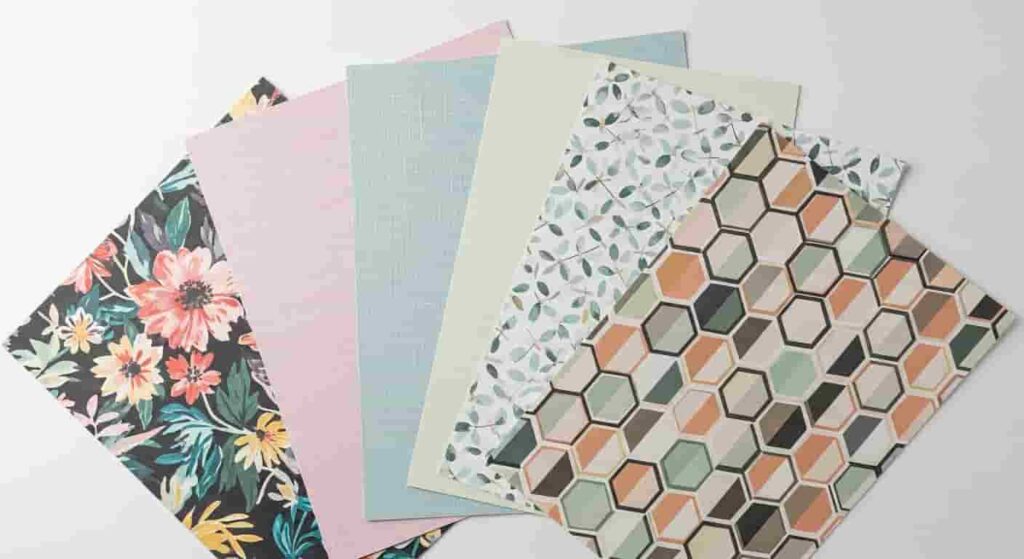
Alright, my fellow DIY adventurers, let’s dive into the wonderful world of removable wallpaper! First up, you’ve got to choose the right design to make your walls sing. Think about the vibe you want to create — are you feeling a funky geometric pattern that screams “party time,” or maybe a soothing floral print that whispers “zen”? Color is crucial too; bold hues can energize a space, while soft pastels might make it feel more tranquil. And don’t forget texture! A bit of linen or a matte finish can add depth, while shiny surfaces reflect light and bring an air of sophistication. So go wild and let your creativity flow!
Now, before you go on a shopping spree that even your bank account would raise an eyebrow at, let’s talk measurements. Grab a measuring tape and channel your inner architect — trust me, it’s easier than it sounds! Measure the height and width of each wall you’re planning to cover. Don’t forget to account for doors, windows, and any pesky outlets that could mess with your wallpaper dreams. Write it all down like you’re drafting your own personal blueprint for success. Once you have those numbers, consult the wallpaper rolls’ specifications to determine how many you need. No one likes an awkward half-wall situation!
When it comes to buying removable wallpaper, there are plenty of reputable brands that won’t let you down. Brands like Spoonflower and Hygge & West have some seriously stunning designs that will make your heart skip a beat. For budget-friendly options, check out Target or Walmart — they’ve got a plethora of patterns that are both chic and wallet-approved. And if you’re feeling particularly adventurous, Etsy is a treasure trove of unique finds from independent artists. So whether you’re going for high-end glam or cute and quirky, there’s something out there for everyone!
Remember, picking the right removable wallpaper isn’t just about aesthetics; it’s about creating a space that reflects your personality and makes you feel at home. So grab that measuring tape and get ready to transform your walls into a masterpiece! Your future self (and your guests) will thank you for it.
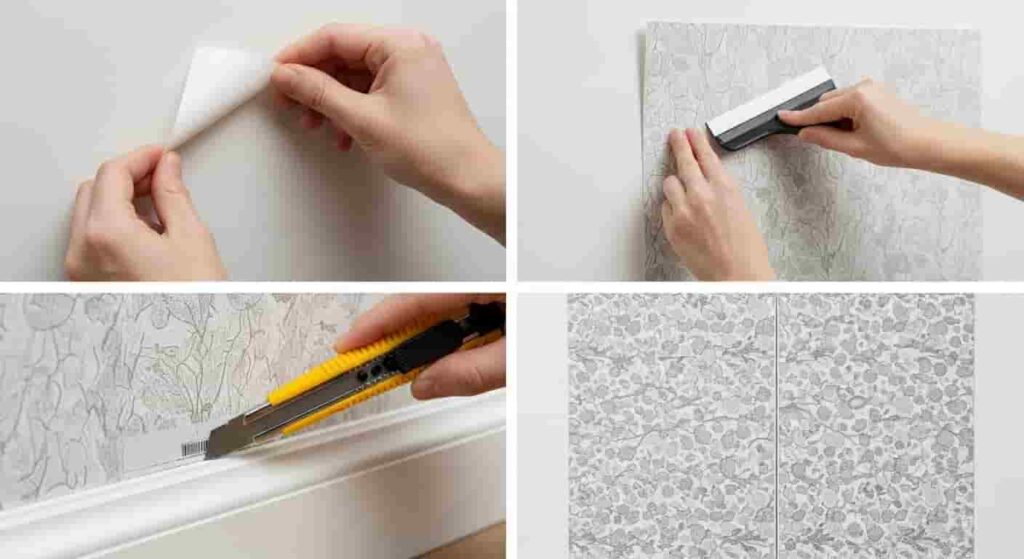
Essential Tools for Installation
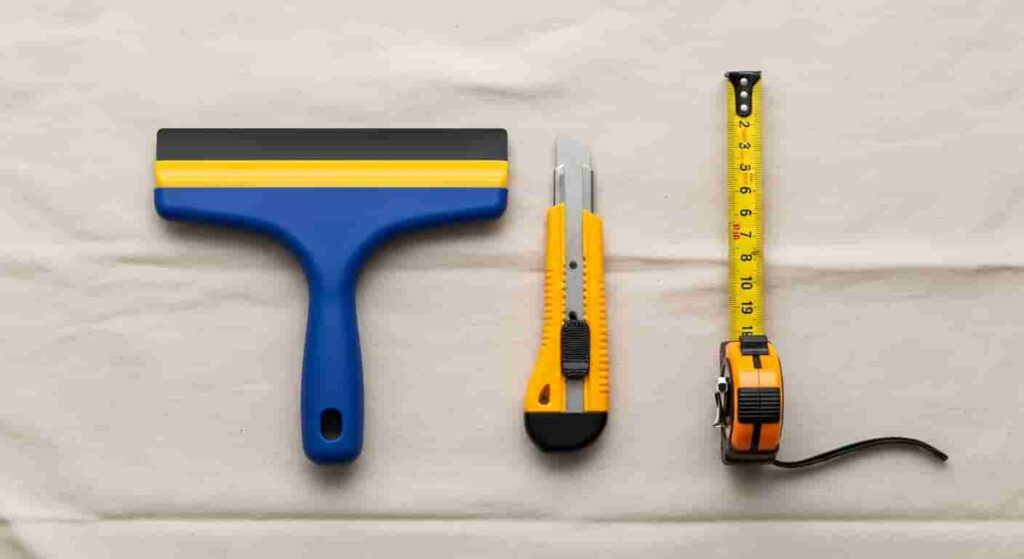
Alright, folks, let’s talk tools! You might be thinking that installing removable wallpaper is as easy as slapping it on the wall and calling it a day. Spoiler alert: it’s not quite that simple. But don’t fret! With the right tools in your DIY arsenal, you’ll be transforming your space like a pro in no time. First things first, here are the essentials you’ll need: a squeegee (for smoothing out those pesky bubbles), a utility knife (for precise cuts and trims), and a measuring tape (because we don’t want to go all Picasso on our walls with wonky placements). Trust us, these basics are like the holy trinity of wallpaper installation!
Now, if you’re feeling ambitious or just want to make your life a tad easier, there are some optional tools that can be real game-changers. A level will ensure your patterns are straight and not leaning like they’ve had one too many cocktails. A wallpaper brush can help you work out stubborn air bubbles that refuse to budge — think of it as your personal bubble-busting assistant. And if you’re feeling crafty, a homemade wallpaper smoother can be fashioned from a piece of cardboard or an old credit card — who knew you could save money and give new life to your expired cards at the same time?
For those of you who are just starting out on your home improvement projects, don’t stress about where to find these tools. Most of them are available at your local hardware store or online retailers. Plus, if you’re on a budget, check out thrift shops or garage sales for hidden gems. You might stumble upon that perfect utility knife while also scoring some vintage decor — talk about a two-for-one deal! Remember, DIY doesn’t mean you have to spend a fortune; sometimes creativity is all about making do with what you have.
So gather your tools, channel your inner DIY guru, and get ready to dive into the world of beginner-friendly wallpaper installation! Because trust us, once you’ve got your tools lined up and ready to go, you’ll be one step closer to revealing the fabulous transformation waiting behind those drab walls.
Preparing Your Space
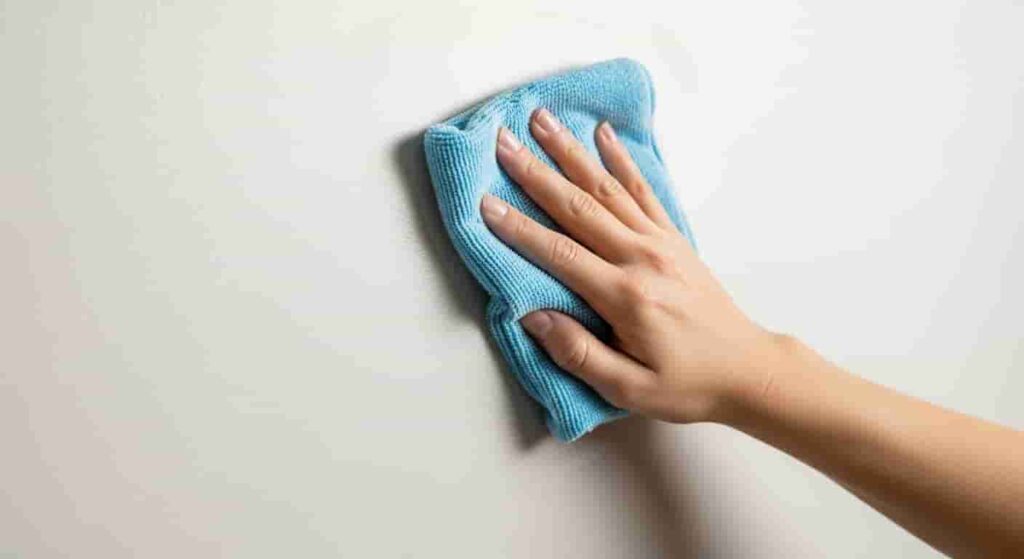
Alright, DIY warriors, before you dive headfirst into the glorious world of removable wallpaper, let’s chat about the all-important prep work. Think of this as your warm-up before the big game; a little effort now will save you from a sticky situation later (pun intended). First up, grab your favorite cleaning supplies because it’s time to show those walls some love. Dust bunnies, grease stains, or mystery smudges have no place in your new wallpaper wonderland! Wipe down your walls with a damp cloth and a mild detergent, ensuring they’re squeaky clean and ready to hold your fabulous design.
Now, let’s talk surface smoothness. If your walls resemble a rollercoaster ride — full of bumps and dips — your removable wallpaper might just decide to take a vacation instead of sticking around. A smooth surface is key for proper adhesion, so consider giving your walls a light sanding if they’re rough. Don’t worry; you don’t need to be a professional painter to do this! Just a little elbow grease will go a long way. And if you have existing wallpaper or paint that’s peeling or flaking? Time to channel your inner demolition expert! Remove any loose materials, and if you’re dealing with stubborn wallpaper, a little warm water and a putty knife can help lift it off like a charm.
For those of you wondering about painted walls, fear not! As long as your paint job is fresh and smooth (no popcorn ceilings here, please), you can absolutely decorate with wallpaper over it. Just make sure the paint is fully cured — give it at least two weeks post-painting before applying that chic new layer. And voilà, you’re now one step closer to transforming your space into a cozy haven filled with personality. So grab those tools for wallpapering, roll up your sleeves, and let’s get this party started!
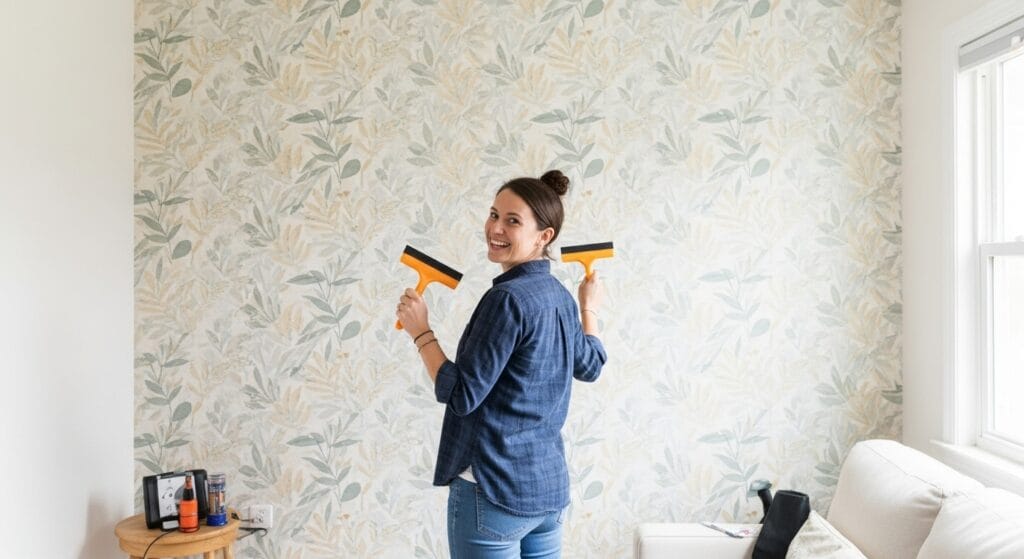
Step-by-Step Installation Process
Alright, folks! You’ve prepped your walls like a pro (shoutout to you for tackling that messy business!), and now it’s time to dive into the fun part: installing your fabulous removable wallpaper. Grab your first panel and let’s get this party started! Begin by peeling back the top few inches of your wallpaper, exposing the adhesive. Make sure you’re aligning it straight — this is where your measuring tape becomes your best friend. Stick the top edge to the wall, ensuring it’s level before pressing down. If you’re feeling fancy, a level tool can help eliminate any potential “whoops” moments!
Now, onto the magic of avoiding those pesky air bubbles! Here’s where easy wallpaper techniques come into play. As you work your way down, use a squeegee or even a credit card (no judgment here) to smooth out the wallpaper from the center outward. This helps push out any air trapped underneath and ensures a flawless finish. Don’t be afraid to gently lift and reposition if things start looking wonky — after all, this is removable wallpaper, not a permanent commitment! Just remember: patience is key, and don’t rush this step; it’ll pay off in the end!
Once you’ve got your first panel down, it’s time to tackle the edges. You want that polished look, so grab your utility knife and a straight edge for guidance. Carefully trim any excess wallpaper along the baseboards or corners, making sure not to cut into the wall itself. If you’re working with a pattern, ensure that the next panel aligns perfectly with the design — because nothing says “I’m a DIY superstar” like matching patterns! If you’ve nailed it (pun intended), you’ll have a seamless transition that looks like it was done by a professional.
And there you have it! With just a little bit of finesse and some playful attitude, you’re well on your way to creating an Instagram-worthy space. So, take a moment to admire your handiwork and prepare for the compliments that are sure to follow!
Troubleshooting Common Issues
So, you’ve just spent hours meticulously installing your gorgeous removable wallpaper, and now — *cue dramatic music* — you see air bubbles and wrinkles ruining your masterpiece. Fear not, my fellow DIY warrior! First off, take a deep breath (or a sip of coffee) because these issues are easier to fix than you think. For those pesky air bubbles, use a squeegee or even a credit card (you know, the one you forgot you had) to gently push the bubble towards the edges. If you encounter a stubborn wrinkle, don’t panic! Simply peel back the wallpaper slightly, smooth it out with your fingers, and reapply. Like a magic trick, poof — smooth walls!
Now, if your self-adhesive wallpaper decides it’s having a rebellious moment and refuses to stick properly, it might be time to reassess your wall prep. Did you skip the cleaning step? Dust and grease can be clingy little monsters that mess with adhesion. If that’s the case, carefully peel it away and wipe down the surface with a damp cloth before trying again. For extra sticking power, consider using a spray adhesive designed for wallpaper; just make sure to follow the instructions so you don’t accidentally create a gluey disaster!
Misalignment? Oh, the horror! But don’t reach for the nearest hammer just yet. To adjust those misaligned panels without starting over (because who has time for that?), carefully peel back the affected section and reposition it. Use your measuring tape to ensure you’re aligned properly this time — remember, math is your friend here! If you’re still struggling, consider using a level or even an app on your phone to get everything straightened out. Trust us, your walls will thank you!
Lastly, remember that everyone makes mistakes — even the pros! Keep calm and embrace the imperfections; after all, that’s what gives your space character. So put on some tunes, grab your tools, and tackle those minor hiccups with confidence. Your removable wallpaper journey may have its bumps, but with these tips in hand, you’ll be turning your home into a designer haven in no time!
Maintaining Your Removable Wallpaper
So, you’ve successfully installed your peel and stick decals or easy install wallpaper and your space is looking like a million bucks — congrats! But wait, the fun doesn’t stop here. To keep that fabulous look going strong, a little TLC is essential. Think of your removable wallpaper like a delicate plant: it needs care to thrive. Start by dusting it regularly with a soft cloth or a microfiber duster to keep those patterns popping and prevent any sneaky buildup of grime. If it gets a bit more than dusty, you can gently wipe it down with a damp cloth (just don’t go all-in with water like you’re washing your car — keep it light!).
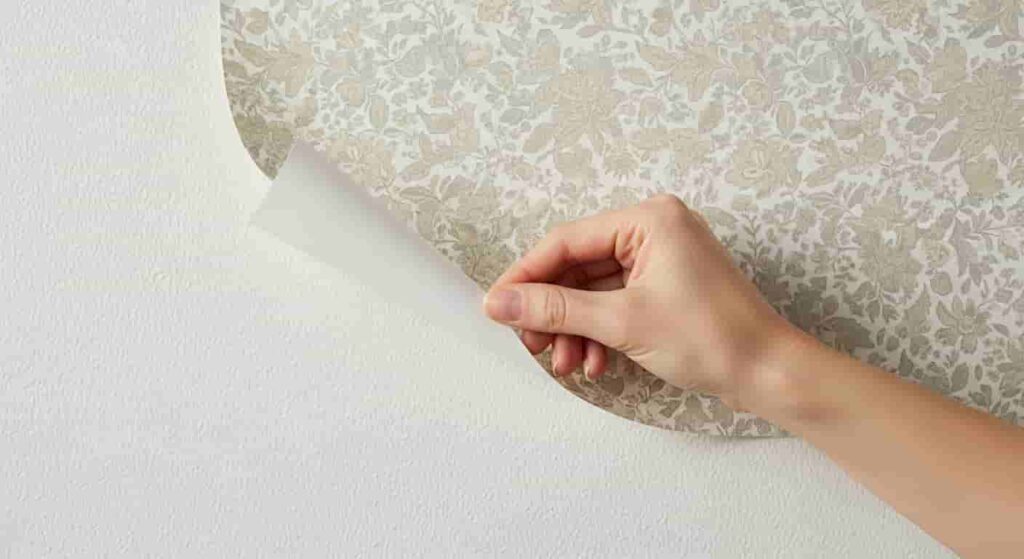
Now, let’s talk about repositioning. One of the best things about removable wallpaper is its flexibility! If you decide your floral pattern is too much for your vibe and you want to switch to stripes, no sweat! To remove it without causing damage, simply peel it back slowly at a 45-degree angle — this helps maintain the integrity of both the wallpaper and your wall. If you want to reposition it rather than toss it, just carefully reapply it to a clean surface, making sure to smooth out any bubbles. It’s like giving your decor a mini-makeover whenever the mood strikes!
But how do you know when it’s time to say goodbye? Look for signs like peeling edges or fading colors — those are usually red flags waving frantically. If you notice that no amount of dusting or gentle wiping can revive the vibrancy of your walls, it might be time to refresh your space. Plus, if your wallpaper starts feeling tacky to the touch or looks worse for wear after countless parties (we see you, wine spills), that’s a solid cue for an upgrade. Remember, your home should reflect your personality and style, so don’t hesitate to swap out those decals when they no longer spark joy!
In summary, caring for your removable wallpaper is all about keeping it clean, knowing how to reposition, and recognizing when it’s time for a change. With these tips in your back pocket, you’ll not only extend the life of your beautiful walls but also ensure they continue to inspire awe from guests — because let’s be real, who doesn’t love a fabulous backdrop for their selfies?
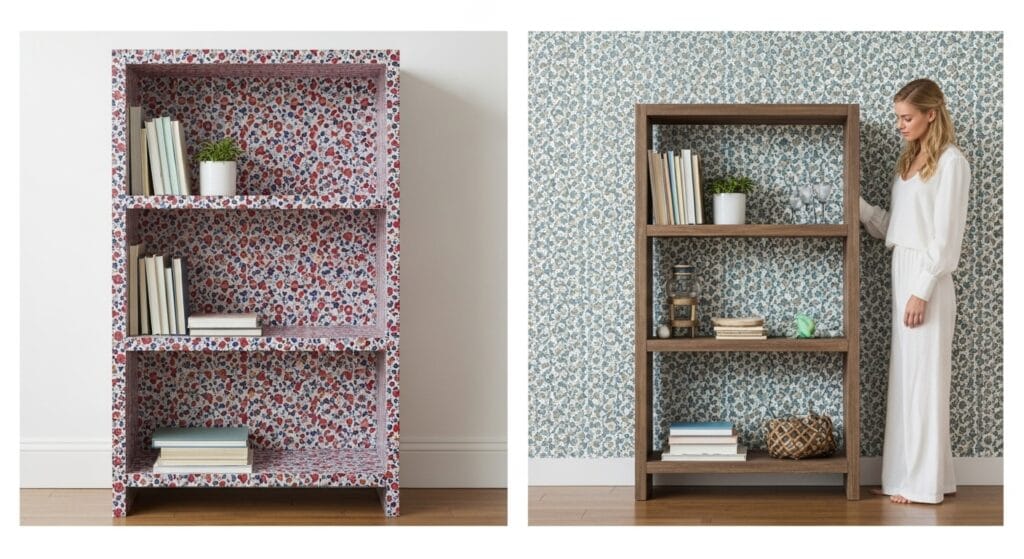
Creative Ideas for Using Removable Wallpaper
So, you’ve mastered the art of installing removable wallpaper on your walls — high-five! 🙌 But wait, before you sit back and admire your handiwork, let’s talk about how to take this fabulous temporary wallpaper to the next level. Why limit yourself to just walls when your furniture, cabinets, and decor can join the party? Imagine transforming a boring dresser into a stunning statement piece with a chic floral print or giving your kitchen cabinets a fresh pop of color. The possibilities are as endless as your creativity! 🎨✨
Feeling seasonal? Removable wallpaper is your best friend! Swap out that summery tropical design for cozy autumn leaves or festive holiday patterns without the hassle of traditional wallpaper. It’s like dressing your home in a new outfit every season — talk about a wardrobe change! Plus, if you’re throwing a themed party (Halloween, anyone?), just whip out some spooky designs to create an atmosphere that’ll have your guests raving. And when the season’s over? Simply peel it off and switch it up again. Easy peasy!
Need some inspo? Let’s take a peek at real-life DIY projects that wowed the internet. One creative soul covered her bathroom vanity with a sleek geometric pattern that made it feel like a luxe spa retreat. Another DIY diva used removable wallpaper to create an accent wall in her nursery, transforming it into a dreamy wonderland filled with whimsical creatures. And let’s not forget about that coffee table that went from drab to fab with a fun vinyl wrap featuring retro comic book art — who wouldn’t want to sip their morning brew surrounded by such flair?
So, whether you’re jazzing up furniture, refreshing decor, or embracing the seasons, removable wallpaper is the secret ingredient to making your space uniquely yours. Now go forth and unleash your inner designer — you’ve got this!
Wrap It Up: Your Removable Wallpaper Adventure Awaits!
So there you have it! Removable wallpaper isn’t just a trendy decor choice; it’s your ticket to transforming any bland space into a vibrant haven of creativity. With a splash of color, a dash of personality, and zero commitment (because who wants to live with something forever?), you can easily elevate your home design game. Whether you’re a renter looking to spice up your apartment or a DIY enthusiast ready to conquer the world of interior design, removable wallpaper is your new best friend.
Now that you’re equipped with all the tips and tricks, it’s time to roll up those sleeves and dive in! Don’t be afraid to unleash your inner design diva — after all, every masterpiece starts with a bold stroke (or peel). And once you’ve nailed that installation, we want to see your fabulous results! Snap a pic, share your stories, and join our community of fearless decorators. Let’s inspire each other to create spaces that truly reflect who we are — one panel at a time!

